 Books
Books Technology
 Electronics
 Programming
 Weaponry
 Arduino
 All tags
 Projects
Programming Arduino controllers and creating projects based on them
For those who have decided to start programming controllers and have chosen Arduino as their starting point, this will provide you with the necessary information. You will learn about the initial steps a novice programmer takes, programming features, errors, and problems that you may encounter along the way.
Wireless Motor Control System for turning security cameras, opening gates, blinds or solar panels
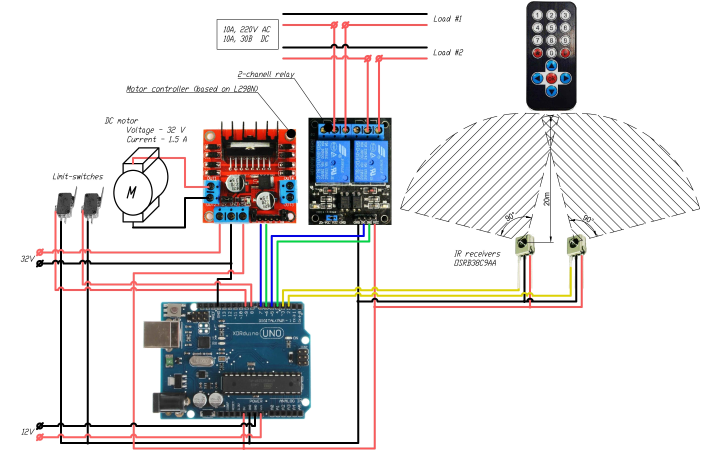
Using infrared receivers and a control panel, it provides remote control of electrical equipment functions. To ensure convenient control without the need to accurately point the remote control towards the control system, several infrared receivers are installed, with overlapping fields of view
Ultraviolet 3D Printer with table swinging
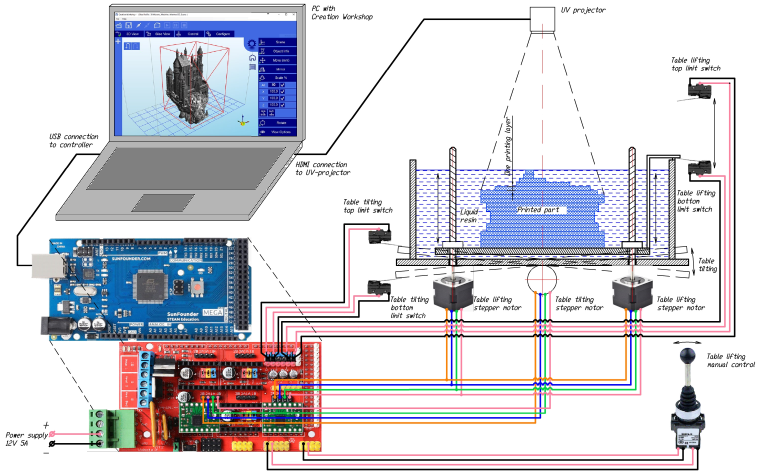
UV curing resin 3D printer with table rocking for better mixing and manual table lift control The part is printed from a liquid resin that hardens under the influence of ultraviolet light. Due to the fact that the thickness of the layers is quite small, after immersion the resin does not always reach the entire surface of the part. To avoid this, use the “Table Rocking” function in between exposures
Electrical load shedding system with temperature sensor
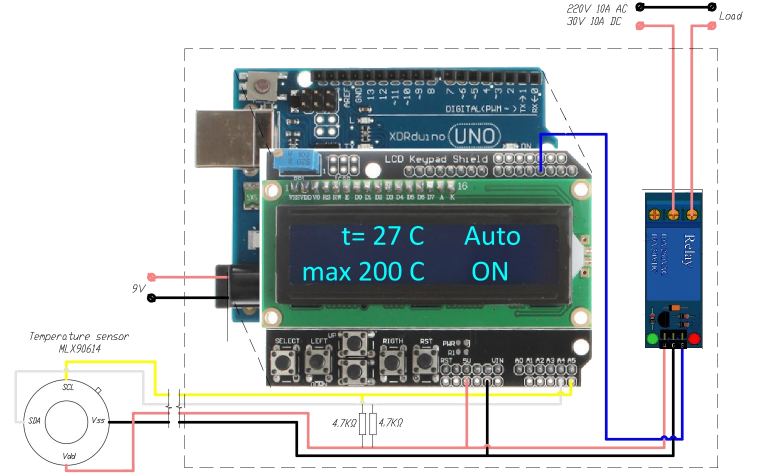
The system is designed for emergency shutdown of electrical load based on the readings of a wireless infrared temperature sensor
The MLX90614 infrared non-contact thermometer measures the temperature of an object and transmits the data to the controller, which turns on or off the relay that controls the load
Score counter for board game with LCD screen
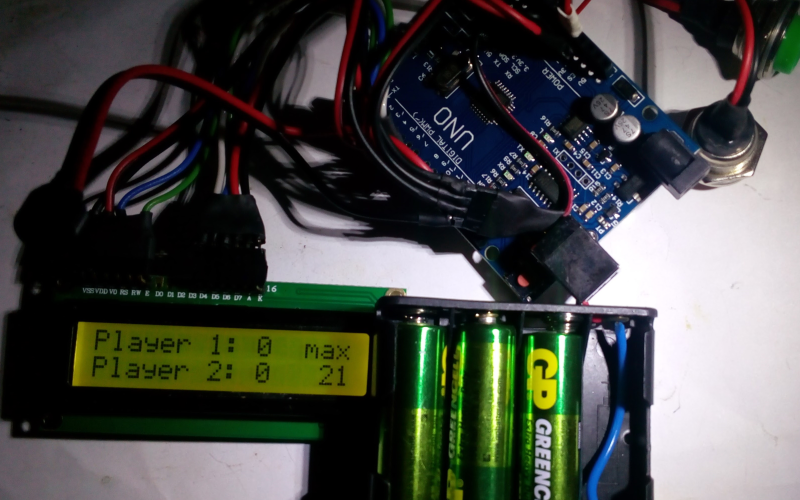
Each player has a button to add score points or current progress. After adding a score point a beep is played (different for different players) and the point is displayed on the screen as well as the second player's points and the final goal. When the final result is reached, a sound signal is played and messages about the winning of the corresponding player are shown. The system has several modes for different games
Voltage and temperature monitoring system with readings transmitted via Bluetooth

System designed for measuring voltage with high accuracy and transmitting results wirelessly to a monitoring system (PC, Mobile phone or other controller equipped with a Bluetooth receiver).
Pulse generation system with configuration specified by the Gantt chart
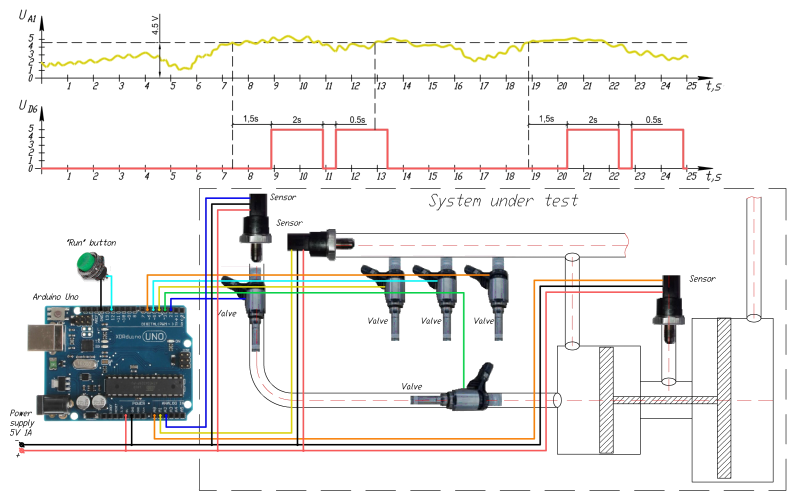
Designed for testing mechanical systems (for example, the fuel system of a car) on a bench using emulation of signals that are normally generated by the on-board computer in operating mode. The serial on-board computer does not always allow you to vary the parameters in the required range. Therefore, this system is used, to which the sensor outputs and control of actuators (molds, valves, etc.) are connected.
Briefcase with riddles to use in escape room amusement
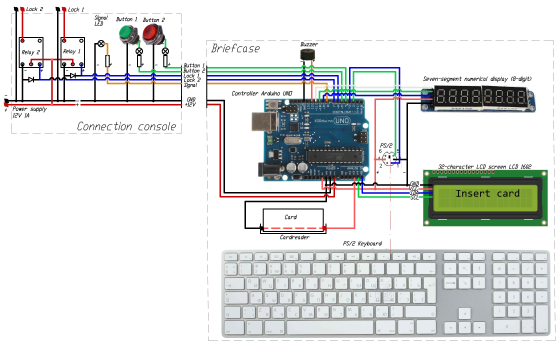
According to the plot of the game, the briefcase is part of the puzzle and must be used in a chain of tasks to open the exit door. The briefcase can be connected to a stationary connection console from which the door lock is unlocked. All actions are accompanied by messages on a numerical display, character LCD screen, and sound signals from a buzzer
Alarm system with ultrasonic proximity sensors
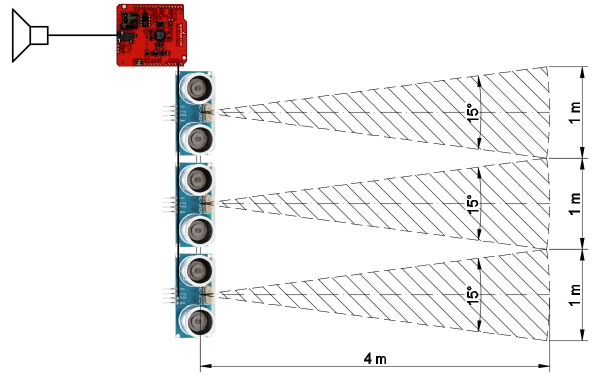
When the proximity sensor is triggered (when approaching or moving away to a certain distance or when motion is detected), a sound signal or a pre-made recording is output. Each sensor can be configured independently. The recording displayed on the speakers is different, depending on the triggered sensor, or one for all The sound signal can be turned off either after the obstacle disappears, or will continue until manual shutdown.
Automatic solar tracker for rotation of solar panel based on illumination measurement
The system is installed on solar panels with a rotation mechanism based on a DC motor. Designed to turn the solar panel towards higher illuminance to maximize luminous flux. Two light sensors are located on the panel - at an angle to the sides of rotation. If the illumination on the left or right sensor is higher by a certain amount, the panel will rotate in this direction.
Automated ballast discharge from a balloon
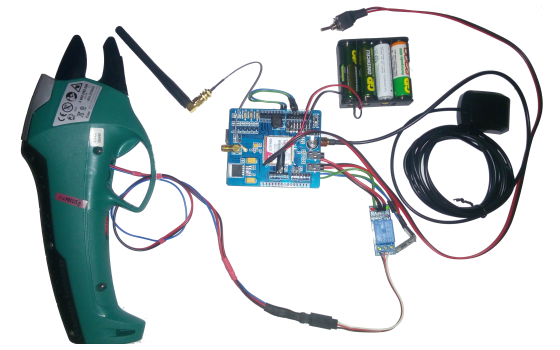
Automated ballast discharge from a balloon using GPS coordinates with a GSM communication channel. The system is installed on a balloon and is designed for emergency ballast release to avoid a collision with the ground in conditions when the balloon driver for some reason does not do this on his own