 Books
Books Technology
 Electronics
 DC motors
 Raspberry Pi Controllers
 Relay
Relay Temperature sensors
 Analog sensors
 Digital sensors
 ADC
ADC Bluetooth
 Radio communication 2.4 GHz
 LCD-screen
 All tags
 Programming
 Web-interface
 Graphical interface
 Windowed Application
 Video
Video Images
 Audio
Audio Text
Text HTML
HTML Lof-files
 Neural networks
 Weaponry
 Projects
Creating your own DC motor control library
Article-series: Arduino, using DC motors #4
So, we go to the The first file, Let's copy our class /* Custom servo control library, header file */
#ifndef MotorS // If the library has not yet been included
#define MotorS // Connect it
#include "Arduino.h" // Use the standard Arduino library
class MotorClass
{
public:
byte pinE; // Digital output number for speed control - must support PWM
byte pinI; // Digital output number for controlling the direction of rotation
boolean SpeedChanging; // Is engine acceleration mode enabled (handled by the UpdateSpeed() function)
unsigned long StartTimer; // Timer for soft start
int StartTimeStep; // Engine power change interval, in ms
int StartPowerStep; // One step change in engine power
int ReqPower; // Up to what value will the engine power change?
int Power; // Engine power (0 - stop, 255 - full power)
int Direction; // Direction of rotation
MotorClass(int pE, int pI) ; // Class constructor. The first argument is the speed control pin number, the second is the direction
void RunMotor(int motorpower); // Set the speed and direction of rotation of the engine
// Negative value - rotation in the opposite direction
void SetSpeed(int newspeed); // Set the engine speed as a percentage of the maximum.
void SetSpeed(int newspeed, int smooth); // Smoothly change the engine speed as a percentage of the maximum.
// Negative value - rotation in the opposite direction
// The smoothness of the change is controlled by the smooth value (time per step of speed change, in ms)
void UpdateSpeed(); // Handling actions that should be performed with a delay, in particular smooth speed changes
};
#endif
When creating a library, you may notice some features:
The file begins with the In addition, we define several functions with the same name but different arguments. This is due to the fact that when using libraries, calling a function with fewer than the defined number of arguments will result in an error. It will not be possible to set default argument values; more precisely, for each case you will need to describe a separate function. Therefore, we have two functions each Now all that remains is to deal with the /* Custom servo control library */
#include "MotorS.h" // Include the header file
MotorClass::MotorClass(int pE, int pI) // Class constructor. The first argument is the speed control pin number, the second is the direction
{
pinE=pE; // Set control pins for speed
pinI=pI; // And rotation directions
pinMode(pinE, OUTPUT); // Set the operation of the corresponding pins as outputs
pinMode(pinI, OUTPUT);
Power=0; // by default the engine is stopped
SpeedChanging=false; // by default the engine is not accelerated
}
void MotorClass::RunMotor(int motorpower) // Set the speed and direction of rotation of the motor
// Negative value - rotation in the opposite direction
{
Direction=(motorpower>0)?HIGH:LOW; // If a positive speed is specified, a HIGH signal is sent to the direction output
digitalWrite(pinI,Direction); // for negative - LOW
digitalWrite(pinE,abs(Power)); // Apply a signal to the speed control output that corresponds to the desired speed
}
void MotorClass::SetSpeed(int newspeed) // Set the motor speed as a percentage of the maximum.
{
Power=(int)newspeed/2.55; // Since the speed varies from 0 to 100%, and the power ranges from 0 to 255,
// calculate the required power value
RunMotor(Power);
}
void MotorClass::SetSpeed(int newspeed, int smooth) // Smoothly change the motor speed as a percentage of the maximum.
// Negative value - rotation in the opposite direction
// The smoothness of the change is controlled by the smooth value (time per step of speed change, in ms)
{
ReqPower=(int)newspeed/2.55; // Since the speed varies from 0 to 100%, and the power ranges from 0 to 255, we calculate the desired value
if (ReqPower>=Power) // In what direction will the power change?
StartPowerStep=1; // increase by 1 (1/255 of full)
else
StartPowerStep=-1; // decrease by 1 (1/255 of full)
StartTimeStep=smooth;
StartTimer=millis(); // Start counting down the time to change the speed
SpeedChanging=true; // set the speed change mode for subsequent processing in the UpdateSpeed() function
}
void MotorClass::UpdateSpeed() // Processing actions that should be performed with a delay
{
if (SpeedChanging) // If the speed changing mode is set
if ((millis()-StartTimer)>= StartTimeStep) // If more time has passed since the previous speed change than specified
{
if (Power!=ReqPower) // Not yet reached the required speed
{
Power+=StartPowerStep; // change the speed
RunMotor(Power); // give a command to the engine
StartTimer=millis(); // set the timer to start counting for the next power change
}
else // If the required speed is reached
SpeedChanging=false; // Turn off speed change mode
}
}
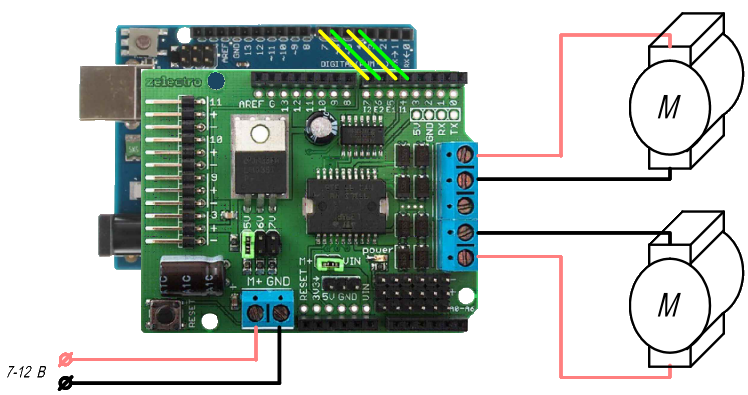
To use our library we will use previous example, in which we connected two motors:
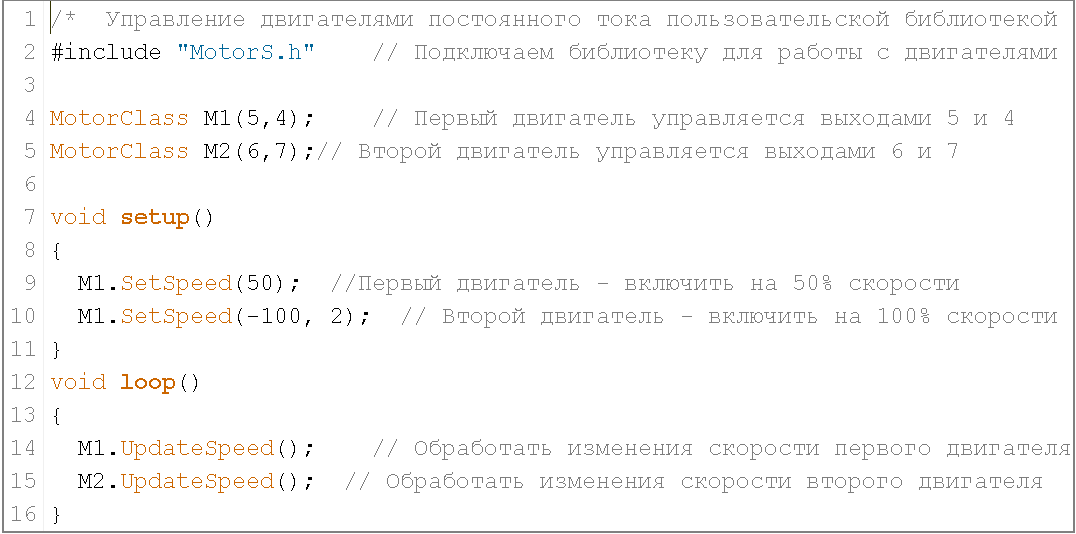
In the program code, we will replace the entire part that was responsible for the description of our MotorClass class with the library connection function /* Control of DC motors with a user library with support for smooth speed changes */
#include "MotorS.h" // Include the library for working with DC motors
MotorClass M1(5,4); // The first motor is controlled by outputs 5 and 4 (speed and direction respectively)
MotorClass M2(6,7); // The second motor is controlled by outputs 6 and 7
void setup()
{
M1.SetSpeed(50); //First engine - turn on at 50% speed
M1.SetSpeed(-100, 2); // Second engine - turn on 100% speed smoothly
}
void loop()
{
M1.UpdateSpeed(); // Handle speed changes of the first motor
M2.UpdateSpeed(); // Handle speed changes of the second motor
}
The result of the program, compared to the usual use of the class, has not changed - the first engine will accelerate to half the maximum speed as quickly as possible, the second will rotate in the opposite direction, and it will take half a second to accelerate from zero to maximum.
All that remains is to take care of highlighting the functions we created in the Arduino IDE. To do this, let’s create a file For the class name and " Let's put information about the keywords that need to be highlighted there:
# Syntax highlighting for the MotorS library
MotorClass KEYWORD1
RunMotor KEYWORD2
SetSpeed KEYWORD2
UpdateSpeed KEYWORD2
A tab sign is placed between the word and its type, and a line feed is placed between the lines.
Let's restart the Arduino IDE again, now our class and its functions are highlighted in the appropriate color:
Without Using Now the code is more legible, and using your own library is no different from using standard libraries/libraries folder of our Arduino development environment, and we see 10-15 folders, each of which represents the standard Arduino library. Let's create a folder here for our library, for example MotorS(the path to it should look something like “/Arduino/libraries/MotorS/"). Inside this folder we will create two files: MotorS.h, MotorS.cpp. Unfortunately, the Arduino IDE does not support editing files with a resolution other than .ino. Therefore, you will have to edit the library either in another development environment that supports C++ or in a regular text editor with syntax highlighting, for example AkelPad.
MotorS.h is a header file (from the word header file), the class itself, variables and functions will be described here. At the same time, there is only a list of variables and functions and their types, without the body of the functions themselves.
MotorClass into the file MotorS.h, more precisely only the variables and function names:
#ifndef ServoS directive, which checks whether this library has been included previously. If we have not connected it anywhere before, then the code located between #define MotorS and #endif will be added to the program
SetSpeed(int newspeed) and SetSpeed(int newspeed, int smooth)
MotorS.cpp file. Here is the code for the functions described in the header file. In this case, we need to indicate which class the called functions belong to. Since our library uses the MotorClass class, all functions will relate to it. In the case of a constructor whose name matches the name of the class, it will look like MotorClass:: MotorClass (), the remaining functions will look like MotorClass::FunctionName();
#include "MotorS.h". The size of the data loaded into the controller will practically not change (after all, we are, in fact, adding code from the library to the one that is displayed in the edit field). But working with such a program is much easier, because we don’t need to copy all the control variables and functions every time we want to control the motors. Here’s what we got:
keywords.txt in the folder with our library (the path to it should look something like “/Arduino/libraries/MotorS/keywords.txt”) In this file we’ll write the names of our class and its method , marking them with "KEYWORD1"
KEYWORD2" for methods:
keywords.txt:

keywords.txt:
Еще:
Похожие: