 Books
Books Technology
 Electronics
 DC motors
 Raspberry Pi Controllers
 Relay
Relay Temperature sensors
 Analog sensors
 Digital sensors
 ADC
ADC Bluetooth
 Radio communication 2.4 GHz
 LCD-screen
 All tags
 Programming
 Web-interface
 Graphical interface
 Windowed Application
 Video
Video Images
 Audio
Audio Text
Text HTML
HTML Lof-files
 Neural networks
 Weaponry
 Projects
Independent control of multiple servos. Timers
Article-series: Programming Arduino from scratch #5
Article-series: Arduino - using_servos #2
#include
// Include the library for working with the servo drive Servo servo1; // Create an object of type “servo drive”
Servo servo2; // Create another object of type “servo drive”
void setup()
int angle1 = 0; // Variable that stores the position of the first servo
int angle2 = 0; // Variable that stores the position of the second servo
{
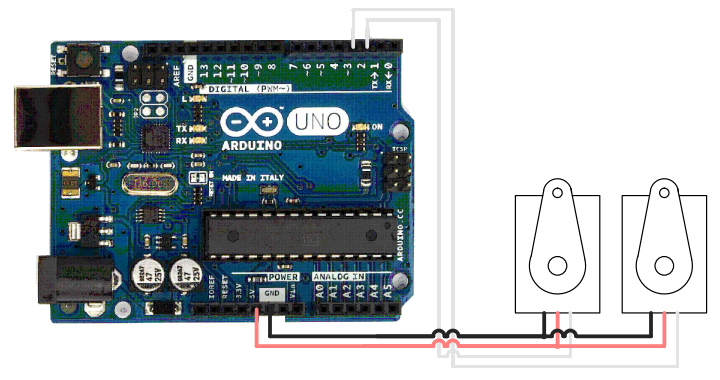
servo1.attach(2); // Explain to the controller that the control wire of the first servo is connected to pin 2
servo2.attach(3); // Explain to the controller that the control wire of the first servo is connected to pin 3
}
void loop()
{
for (angle1 = 0; angle1 <= 180; angle1 += 1) // Start moving from 0 to 180 degrees
{
servo1.write(angle1); // Command the first servo to accept the new position
delay(10); // Pause before next move
}
for (angle2 = 0; angle2 <= 180; angle2 += 1) // Start moving from 0 to 180 degrees
{
servo1.write(angle2); // Command the second servo to accept the new position
delay(10); // Pause before next move
}
}
The result of the program is somewhat different from what we need. The servos do not move synchronously; the second one starts moving only after the first one. The fact is that the delay() command stops the execution of all actions for a specified time. And the second loop will not start executing until the first one is completed. The simplest solution, at first glance, is to give a command to both servos in one cycle:
for (angle = 0; angle <= 180; angle += 1) // Start moving from 0 to 180 degrees
{
servo.write(angle1); // Command the first servo to accept the new position
servo.write(angle1); // Command the first servo to accept the new position
delay(10); // Pause before next move
}
But in this case, the servos can only move at the same speed, which is not suitable in all cases. We need a more universal option, with completely independent control. Therefore, instead of using a delay, it makes sense to use timers.
unsigned long variable to count time. This is due to the fact that the int type can store numbers from -32,768 to 32,767. Since we operate in milliseconds, after 32.67 seconds from the start of the program we will no longer be able to use int to store the counting time. Otherwise, the program's behavior will become unpredictable. But the long type can already store a number from -2,147,483,648 to 2,147,483,647, and without taking into account the sign unsigned long - from 0 to 4,294,967,295. T The maximum timer value is 4,294,967 seconds or almost 49 days. I don't think our program will run that long without interruption millis() function. This function returns the amount of time that has passed since the program was started, accurate to one thousandth of a second. Let's add polling of the current time to our loop() function. We will perform the required action - turning the servo - only if a certain time has passed since the previous survey
#include  // Include the library for working with the servo drive
Servo servo1; // Create one object of type “servo drive”
int angle = 0; // Variable that stores the servo position
int interval = 10; // Time interval after which the servo will rotate by one degree
unsigned long lastTimeCheck; // Time of the last movement of the servo drive, in ms from the start of the program
void setup()
{
servo1.attach(2); // Explain to the controller that the servo drive control wire is connected to pin 2
lastTimeCheck=millis(); // Timing for servo movements will begin with the start of the program
}
void loop()
{
If (angle < 180) // Until we reach the extreme position
{
If ((millis()-lastTimeCheck)>= interval) // check how much time has passed since the last
//actions and compare with the interval we need.
//If more time has passed, perform the next action
{
angle++; // Change the angle by one degree
servo1.write(angle); // Send a command to the servo with a new rotation angle
lastTimeCheck= millis(); // Update the time counter so that the next time countdown starts from this moment
}
}
}
At first glance, nothing has changed; the servo also smoothly changes its position in 1.8 seconds. Now let's connect two servos
Servo servo1; // Create one object
servo drive type object
int angle1 = 0; // Variable that stores the position of the first servo
int interval1 = 10; // Time interval after which the first servo will rotate by one degree
unsigned long lastTimeCheck1; // Time of the last movement of the first servo, in ms from the start of the program
Servo servo2; // Create another object of type “servo drive”
int angle2 = 0; // Variable that stores the position of the second servo
int interval2 = 20; // Time interval after which the second servo will rotate by one degree
unsigned long lastTimeCheck2; // Time of the last movement of the second servo, in ms from the start of the program
void setup()
{
servo1.attach(2); // Explain to the controller that the servo drive control wire is connected to pin 2
servo1.attach(3); // Explain to the controller that the control wire of the second servo is connected to pin 3
lastTimeCheck=millis(); // Timing for servo movements will begin with the start of the program
lastTimeCheck2=millis(); // Timing for servo movements will begin with the start of the program

}
void loop()
{
if (angle1 < 180) // Until we reach the extreme position
{
If ((millis()-lastTimeCheck1)>= interval1) // check how much time has passed since the last
//actions and compare with the interval we need.
//If more time has passed, perform the next action
{
angle1++; // Change the angle by one degree
servo1.write(angle1); // Send a command to the first servo with a new rotation angle
lastTimeCheck1= millis(); // Update the time counter so that the next time countdown starts from this moment
}
}
if (angle2 < 180) // Until we reach the extreme position
{
if ((millis()-lastTimeCheck2)>= interval2) // check how much time has passed since the last
//actions and compare with the interval we need.
//If more time has passed, perform the next action
{
angle2++; // Change the angle by one degree
servo1.write(angle2); // Send a command to the second servo with a new rotation angle
lastTimeCheck2= millis(); // Update the time counter so that the next time countdown starts from this moment
}
}

}
The only thing you need to take into account is that with small interval values and a large number of actions performed in loop(), the frequency of calling this function may be greater than the specified interval. Accordingly, the action will not be performed after the specified time, but only with the next call to loop() This situation can arise, for example, when continuously outputting text through Serial.print(). It is not recommended to place this function in loop(). And if we need to continuously output some information, then we can limit the frequency in the same way as for the movement of servos:
if ((millis()-lastMessageTime)>= interval) // check how much time has passed since the last message was displayed
// and compare with the interval we need. If more time has passed, send the next message
{
Serial.print(“time=”);
Serial.println(lastMessageTime);
lastMessageTime = millis(); // Update the time counter to
// the next countdown starts from this moment
}
Now we have ensured that the servos perform all actions independently. Moreover, in parallel with the movement, you can continue executing the program and perform any other actions