 Books
Books Technology
 Electronics
 DC motors
 Raspberry Pi Controllers
 All tags
 Programming
 Web-interface
 Graphical interface
 Windowed Application
 Video
Video Images
 Audio
Audio Text
Text HTML
HTML Lof-files
 Neural networks
 Weaponry
 Projects
Creating a class to control a servo drive
Article-series: Programming Arduino from scratch #6
Article-series: Arduino - using_servos #3
It makes sense to create your own class for a servo drive, in which you can register all the necessary variables and functions once. Then we will only need to initialize this class once for each of the servos and not copy all the variables.
An example of such a simple class that simply smoothly rotates the servo 180 degrees:
#include  // Include the library for working with the servo drive
class ServoClass
{
Servo serv; // Actually the servo itself, controlled by the standard
// servo library
int servPosition; // Current servo position
int interval;
unsigned long lastTimeCheck; // Time of the last movement of the servo drive, in ms from the start of the program
public:
ServoClass()
{
   interval=10;
   servPosition=0;
lastTimeCheck=millis();
}
void AttachServo(int pin)
{
serv.attach(pin); // Connect the servo to the specified pin
servPosition= 0; // The servo position should match the initial position - 0 degrees
serv.write(servPosition); // Give the command to change position
}
void Update()
{
if (servPosition<180)
{
if ((millis() - lastTimeCheck)>= interval) // check how much time has passed since the last
//actions and compare with the interval we need.
//If more time has passed, perform the next action
{
servPosition++; // Change the angle by one degree
serv.write(servPosition); // Send a command to the servo with a new rotation angle
lastTimeCheck= millis(); // Update the time counter so that the next time countdown starts from this moment
                 }
         }

}
};
Now we have a class that describes a rudimentary servo. Our variables are the same as in the previous example. But the functions are slightly different:
ServoClass () – The first function we define is the constructor of a class whose name matches the name of the class. It will be called the first time we define any variable of type
ServoClass. Here we set the default variables. For example, we set the position to 0 degrees;
void AttachServo (int pin) – Here we tell the controller which output the servo is connected to and initialize it. If the class constructor is called when defining a variable of type ServoClass, then we must perform the initialization at program start, i.e. inside the setup(); function
void Update () - This function specifies actions that need to be performed constantly - in this case, the movement of the servo drive according to a timer. We add this function to the loop() function
Now let's write a simple program that will use our class. Let's add to the previously written code the standard functions setup() and loop()
#include  // Include the library for working with the servo drive
class ServoClass
{
// Here's our class code from above
};
ServoClass serv1; // Define a variable of type ServoClass (call
// constructor ServoClass() )
void setup()
{
  serv1.AttachServo(2); // Initialize the servo connected
// with 2 digital output
}

void loop()
{
  serv1.Update(); // In an endless loop, we ask if we need to change
// position of the servo and organize its movement
}
When starting, we achieved the same result as in the previous example - smooth movement of the servo from 0 to 180 degrees. The functionality of the program itself fit into three lines, but the description of the class took up most of the program. Therefore, using classes to control one servo is not effective. But let's try to add a couple more servos: 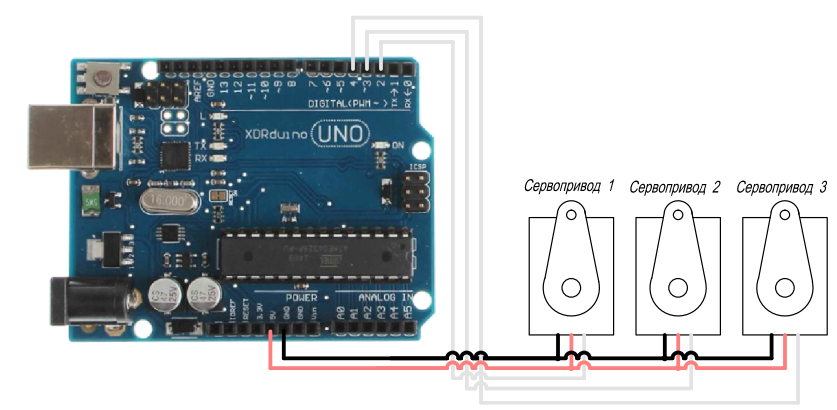
Our class has not changed, and in the main body of the program we add very little code:
#include  // Include the library for working with the servo drive
class ServoClass
{
// Here's our class code from above
};
ServoClass serv1; // Define variables of type ServoClass for each
ServoClass serv2; //servo drive (call the ServoClass() constructor)
ServoClass serv3;
void setup()
{
  serv1.AttachServo(2); // Initialize the servo connected
// with 2 digital output
serv2.AttachServo(3); // The second servo is connected to output 3
serv3.AttachServo(4); // The third servo is connected to output 4


}

void loop()
{
  serv1.Update(); // Movement of the first servo
serv2.Update(); //Move the second servo
serv3.Update(); //Move the third servo
}
Now the benefits of using the class are visible to the naked eye. Despite increasing the number of servos used, the size of the program remained virtually unchanged, and we were spared the monotonous work of copying the same code for each servo and changing the variable names.