Moving speed regulation, servo control class
Article-series: Arduino - using_servos #5
To do this, we will add the corresponding variables and functions that set them.
In addition to the function we have already made void MoveTo(int movepos), we will add the function void MoveTo(int movepos, float movespeed). They have the same names, but different numbers of arguments. This option is used instead of specifying the default values of missing arguments when the functionality strongly depends on the number of arguments. In this case, calling MoveTo(50) will move the servo to the specified position as quickly as possible. But the call MoveTo(50, 1.0) will correspond to smooth movement at a speed of 1 revolution per minute (6 degrees per second). Since the servo drive does not make it possible to change the speed of movement, the required rotation will be divided into several micro-movements of 1 degree each, the interval between which will be such as to ensure the specified speed. To determine this interval, we will perform simple calculations
float RotationSpeed=moveSpeed*360/60; // Convert the speed from revolutions per minute to degrees per second
moveInterval=(int)1000/RotationSpeed; // Calculate the interval between movements by one degree
Don’t forget to first determine which direction you need to move, i.e. add or subtract a degree for each micro-movement, for this it is enough to know the current and required position
if (movePosition >= servPosition) // Determine which direction from the current position we need to move
moveIncrement=1; // If forward, we will add one degree per time interval
else
moveIncrement=-1; // If back, then take away
Do not forget to check whether the required movement does not exceed the established extreme values. Since the same check needs to be performed for both implementations of the MoveTo() function, it makes sense to allocate a separate function for it
int PositionCheck(int movepos)
{
int CheckedPos;
if (movepos<=posMin) // If a value greater than the maximum is specified
// movement limit
CheckedPos =posMin; // We will only move up to this limit
else
if (movepos>=posMax) // If a value less than the minimum is specified
//travel limit
CheckedPos =posMin; // We will only move up to this limit
else // In any other cases, we are within the permissible limits for movement
CheckedPos = movepos; // Just set the position where we should
return CheckedPos;
}
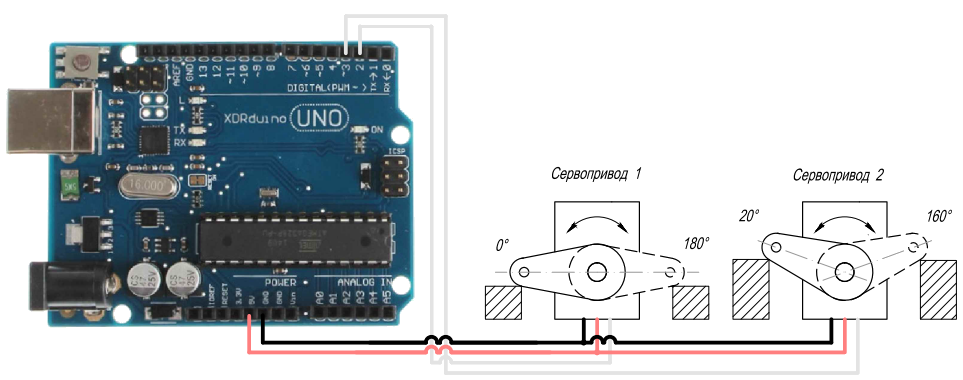
The connection is standard, to the second and third digital output:

//Control servos using a custom class, task
// instant and smooth movement using a single function call
#include  // Include the library for working with the servo drive
class ServoClass
{
Servo serv; // Actually the servo itself, controlled by the standard
// servo library
int servPosition; // Current servo position, degrees
int posMax; // Maximum permissible limit of servo movement, degrees
int posMin; // Minimum permissible limit of servo movement, degrees
int posInit; // Initial position of the servo, degrees

// Variables that are responsible for movement
boolean move; // Should the servo currently move?
int movePosition; // Position the servo should take, degrees
float moveSpeed; // Speed at which the servo should move, rpm
int moveIncrement; // change in position over one time interval, degrees
int moveInterval; // Interval between movements to ensure speed, milliseconds


unsigned long lastTimeCheck; // Time of the last movement of the servo drive, in ms from the start of the program
public:
ServoClass()
{
posMin=0;
posMax=180;
posInit=0;
servPosition=0;
lastTimeCheck=millis();
}
void AttachServo (int pin, int minpos=0, int maxpos=180, int initpos=0)
{
serv.attach(pin); // Connect the servo to the specified pin
posMin= minpos; // Set the minimum position
posMax= maxpos; // Set the maximum position
posInit= initpos; // Set the starting position
servPosition= posInit; // The servo position must match the home position
serv.write(servPosition); // Give the command to change position
}
int PositionCheck(int movepos)
{int CheckedPos;
if (movepos<=posMin) // If a value greater than the maximum is specified
// movement limit
CheckedPos =posMin; // We will only move up to this limit
else
if (movepos>=posMax) // If a value less than the minimum is specified
//travel limit
CheckedPos =posMin; // We will only move up to this limit
else // In any other cases, we are within the permissible limits for movement
CheckedPos = movepos; // Just set the position where we should
return CheckedPos;
}

void MoveTo (int movepos) // If the speed is not specified, simply give a command to move the servo
{

movePosition = PositionCheck(movepos); // Check if we are within the permissible movement limits
serv.write(servPosition); // Give the command to change position
}

void MoveTo (int movepos, float movespeed) // If the speed is specified, we organize smooth movement
{
movePosition = PositionCheck(movepos); // Check if we are within the permissible movement limits
moveSpeed=movespeed; // Set the speed at which the servo should move
int Angle=abs(movePosition-servPosition); // How much should the servo move
// regardless of direction
if (movePosition >= servPosition) // Determine which direction from the current position we need to move
moveIncrement=1; // If forward, we will add one degree per time interval
else
moveIncrement=-1; // If back, then take away
float RotationSpeed=moveSpeed*360/60; // Convert the speed from revolutions per minute to degrees per second
moveInterval=(int)1000/RotationSpeed; // Calculate the interval between movements by one degree
move=true; // Give the command to start smooth movement
}

void Update()
{
if (move) //If a command to move is given
{
if ((millis() - lastTimeCheck)>= moveInterval) // check how much time has passed since the last
//actions and compare with the interval we need.
//If more time has passed, perform the next action
{
servPosition+=moveIncrement; // Change the angle to the previously calculated value
serv.write(servPosition); // Send a command to the servo with a new rotation angle
lastTimeCheck= millis(); // Update the time counter so that the next time countdown starts from this moment
if (servPosition==movePosition) // If we have reached the desired position -
move=false; // stop movement
}
}

}
};

ServoClass serv1;
ServoClass serv2;
void setup()
{
serv1.AttachServo(2); // The first servo is connected to the second pin
// Standard movement limits from 0 to 180 degrees
// Default home position is 0 degrees
serv2.AttachServo(3, 20, 160, 90); // The second servo is connected to the third pin
// Limits of movement from 20 to 160 degrees
// Starting position - 90 degrees
serv1.MoveTo(20); // Move the first servo to the 20 degree position
serv2.MoveTo(150, 0.5); // Move the second servo to the 150 degree position at 0.5 rpm

}

void loop()
{
serv1.Update(); // Process the movements of the first servo
serv2.Update(); // Process the movements of the second servo
}
Now, when the program starts, the first servo, as in the previous example, will take the specified position. But the second one will turn quite slowly (its initial position is 90 degrees, to move to a position of 150 degrees you need to turn 60 degrees. A speed of 0.5 revolutions per minute corresponds to 3 degrees per second, i.e. the movement will take 20 seconds). Even if such movement is not entirely smooth, it still allows you to control the servo drive more flexibly, and just one command is enough

 Books
Books Technology
 Electronics
 DC motors
 Raspberry Pi Controllers
 Relay
Relay Temperature sensors
 Analog sensors
 Digital sensors
 ADC
ADC Bluetooth
 Radio communication 2.4 GHz
 LCD-screen
 All tags
 Programming
 Web-interface
 Graphical interface
 Windowed Application
 Video
Video Images
 Audio
Audio Text
Text HTML
HTML Lof-files
 Neural networks
 Weaponry
 Projects