Software limitation of servo movement
Article-series: Arduino - using_servos #4
AttachServo(2); will be equivalent to AttachServo(2,0,180,0); and will connect the servo drive to the second pin with standard values of movement limits. To do this, let's add a couple of variables posMax and posMin to our class. At the same time, we’ll take care of the initial position of the servo drive, in which it should be when the program starts, we’ll define it using the posInit variable. We will set the values of these variables simultaneously with the initialization of the servo drive; for this we will add three more arguments to the AttachServo function:
void AttachServo (int pin, int minpos=0, int maxpos=180, int initpos=0)
Example of initializing servos with travel limits:
void setup()
{
   serv1.AttachServo(2); // The first servo is connected to the second pin
                           // Standard movement limits from 0 to 180 degrees
                           // Default home position is 0 degrees
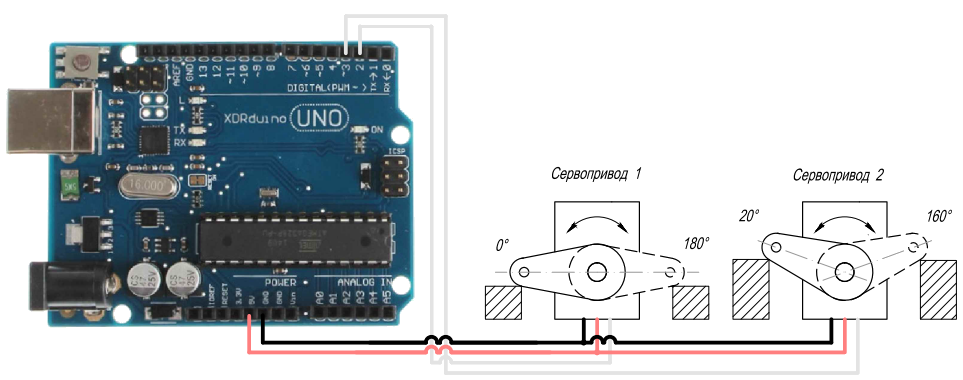
   serv2.AttachServo(3, 20, 160, 90); // The second servo is connected to the third pin
                                       // Limits of movement from 20 to 160 degrees
                                       // Starting position - 90 degrees
}

Now let's create the MoveTo function, with which we will control the movement of the servo. In the simplest version, we will just need to move the servo to the desired position. To do this, simply call this function with one argument - the position we need, for example serv1.MoveTo(20); will command the first servo to rotate to a position of 20 degrees. Since we previously set the maximum and minimum movement limits, attempting to call the function with the wrong angle - serv2.MoveTo(220); will cause the servo to rotate to the set maximum value of 160 degrees and stop.
Here's what we got:
//Control servos using a custom class, task
// movements using a single function call with software movement restrictions
#include  // Include the library for working with the servo drive
class ServoClass
{
Servo serv; // The servo itself, controlled by the standard servo library
int servPosition;// Current servo position, degrees
int posMax; // Maximum permissible limit of servo movement, degrees
int posMin; // Minimum permissible limit of servo movement, degrees
int posInit; // Initial position of the servo, degrees

public:
ServoClass()
{
posMin=0; // Set the default value
posMax=180;
posInit=0;
servPosition=0;
}
void AttachServo (int pin, int minpos=0, int maxpos=180, int initpos=0)
{
serv.attach(pin); // Connect the servo to the specified pin
posMin= minpos; // Set the minimum position
posMax= maxpos; // Set the maximum position
posInit= initpos; // Set the starting position
servPosition= posInit; // The servo position must match the home position
serv.write(servPosition); // Give the command to change position
}
void MoveTo (int movepos) // Give a command to move the servo
{
// Check if we are within the permissible movement limits
if (movepos<=posMin) // If a value greater than the maximum is specified
// movement limit
movePosition=posMin; // We will only move up to this limit
else
if (movepos>=posMax) // If a value less than the minimum is specified
//travel limit
movePosition=posMin; // We will only move up to this limit
else // In any other cases, we are within the permissible limits for movement
movePosition=movepos; // Just set the position where we should
// move the servo

serv.write(servPosition); // Give the command to change position
}
};

ServoClass serv1; // first servo
ServoClass serv2;
void setup()
{
serv1.AttachServo(2); // The first servo is connected to the second pin
// Standard movement limits from 0 to 180 degrees
// Default home position is 0 degrees
serv2.AttachServo(3, 20, 160, 90); // The second servo is connected to the third pin
// Limits of movement from 20 to 160 degrees
// Starting position - 90 degrees
serv1.MoveTo(20); // Move the first servo to the 20 degree position
serv2.MoveTo(220); // Move the second servo to the 220 degree position
// due to the limitation on the maximum movement of the servo
// Rotate to 160 degrees and stop
}

void loop()
{

}
Now we can not be afraid that we will give a command to move incorrectly and the servo will run into an obstacle. It is enough to restrict movements once during initialization.

 Books
Books Technology
 Electronics
 DC motors
 Raspberry Pi Controllers
 All tags
 Programming
 Web-interface
 Graphical interface
 Windowed Application
 Video
Video Images
 Audio
Audio Text
Text HTML
HTML Weaponry
 Projects