Books
Books Technology
 Electronics
 DC motors
 Raspberry Pi Controllers
 Relay
Relay Temperature sensors
 Analog sensors
 Digital sensors
 ADC
ADC Bluetooth
 Radio communication 2.4 GHz
 LCD-screen
 All tags
 Programming
 Web-interface
 Graphical interface
 Windowed Application
 Video
Video Images
 Audio
Audio Text
Text HTML
HTML Lof-files
 Neural networks
 Weaponry
 Projects
Engraver machine
Engraver
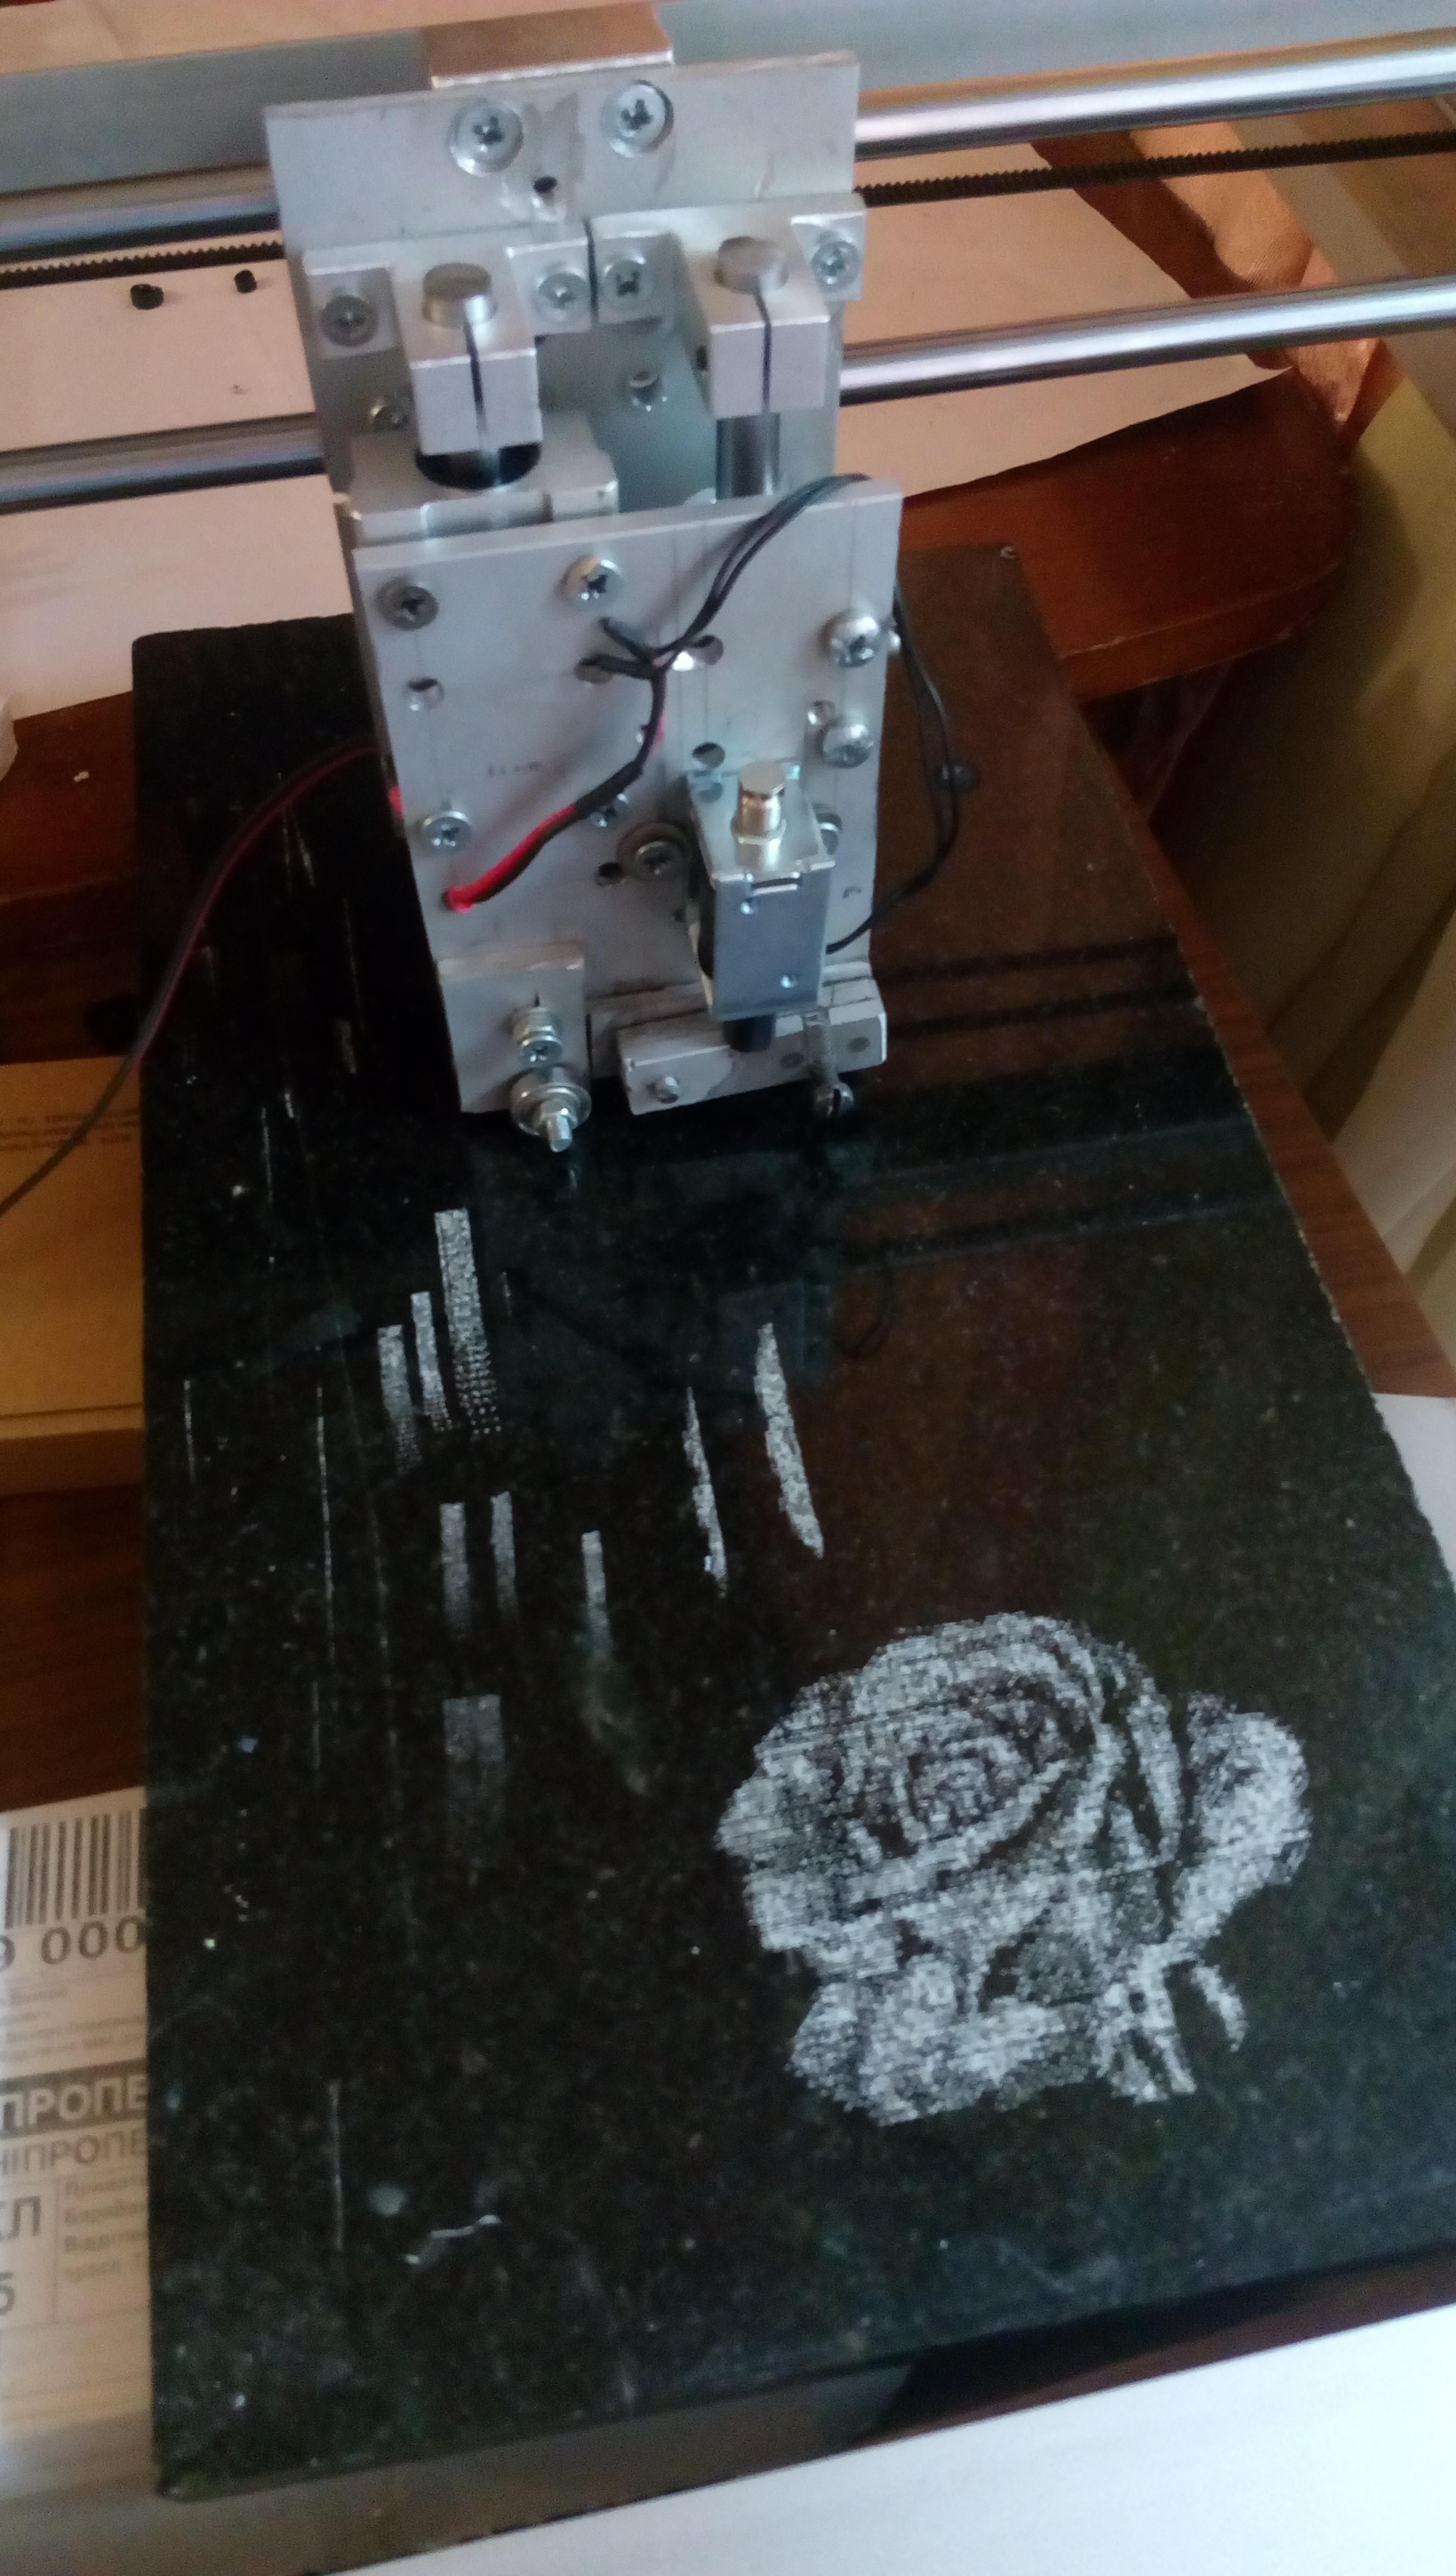
Engraver machine designed for stone engraving using solenoid with engraving cutter
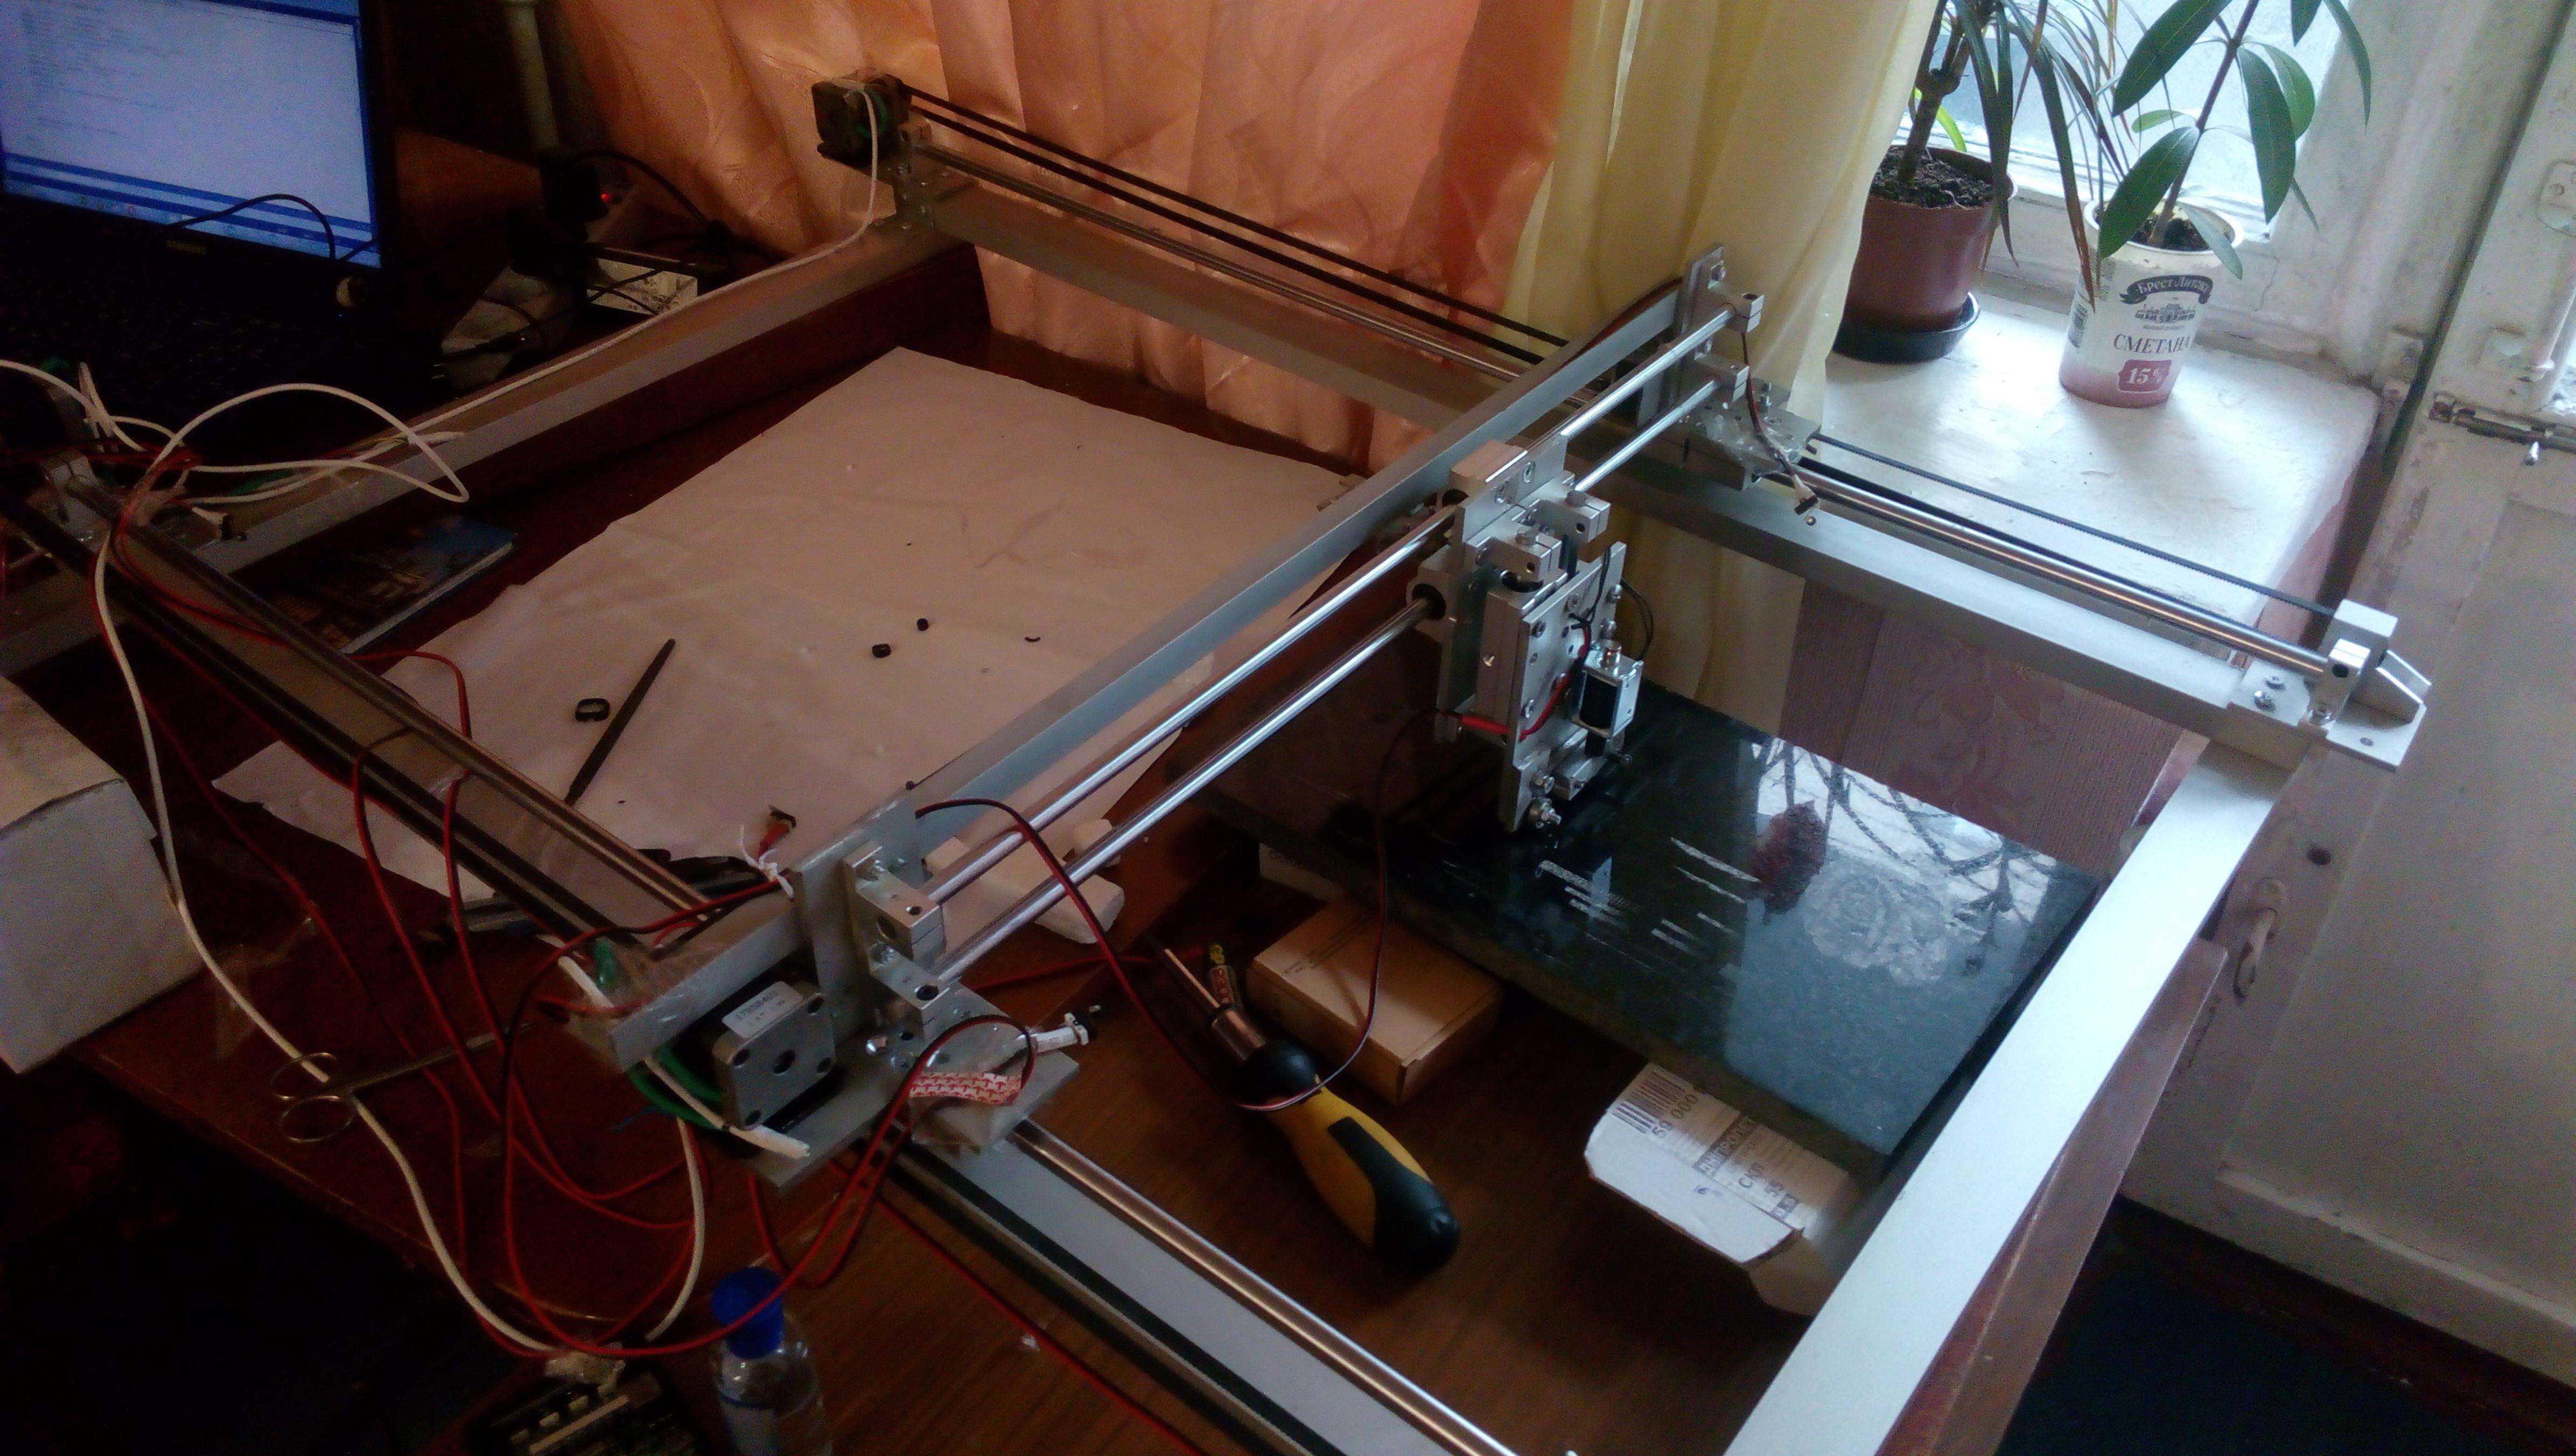
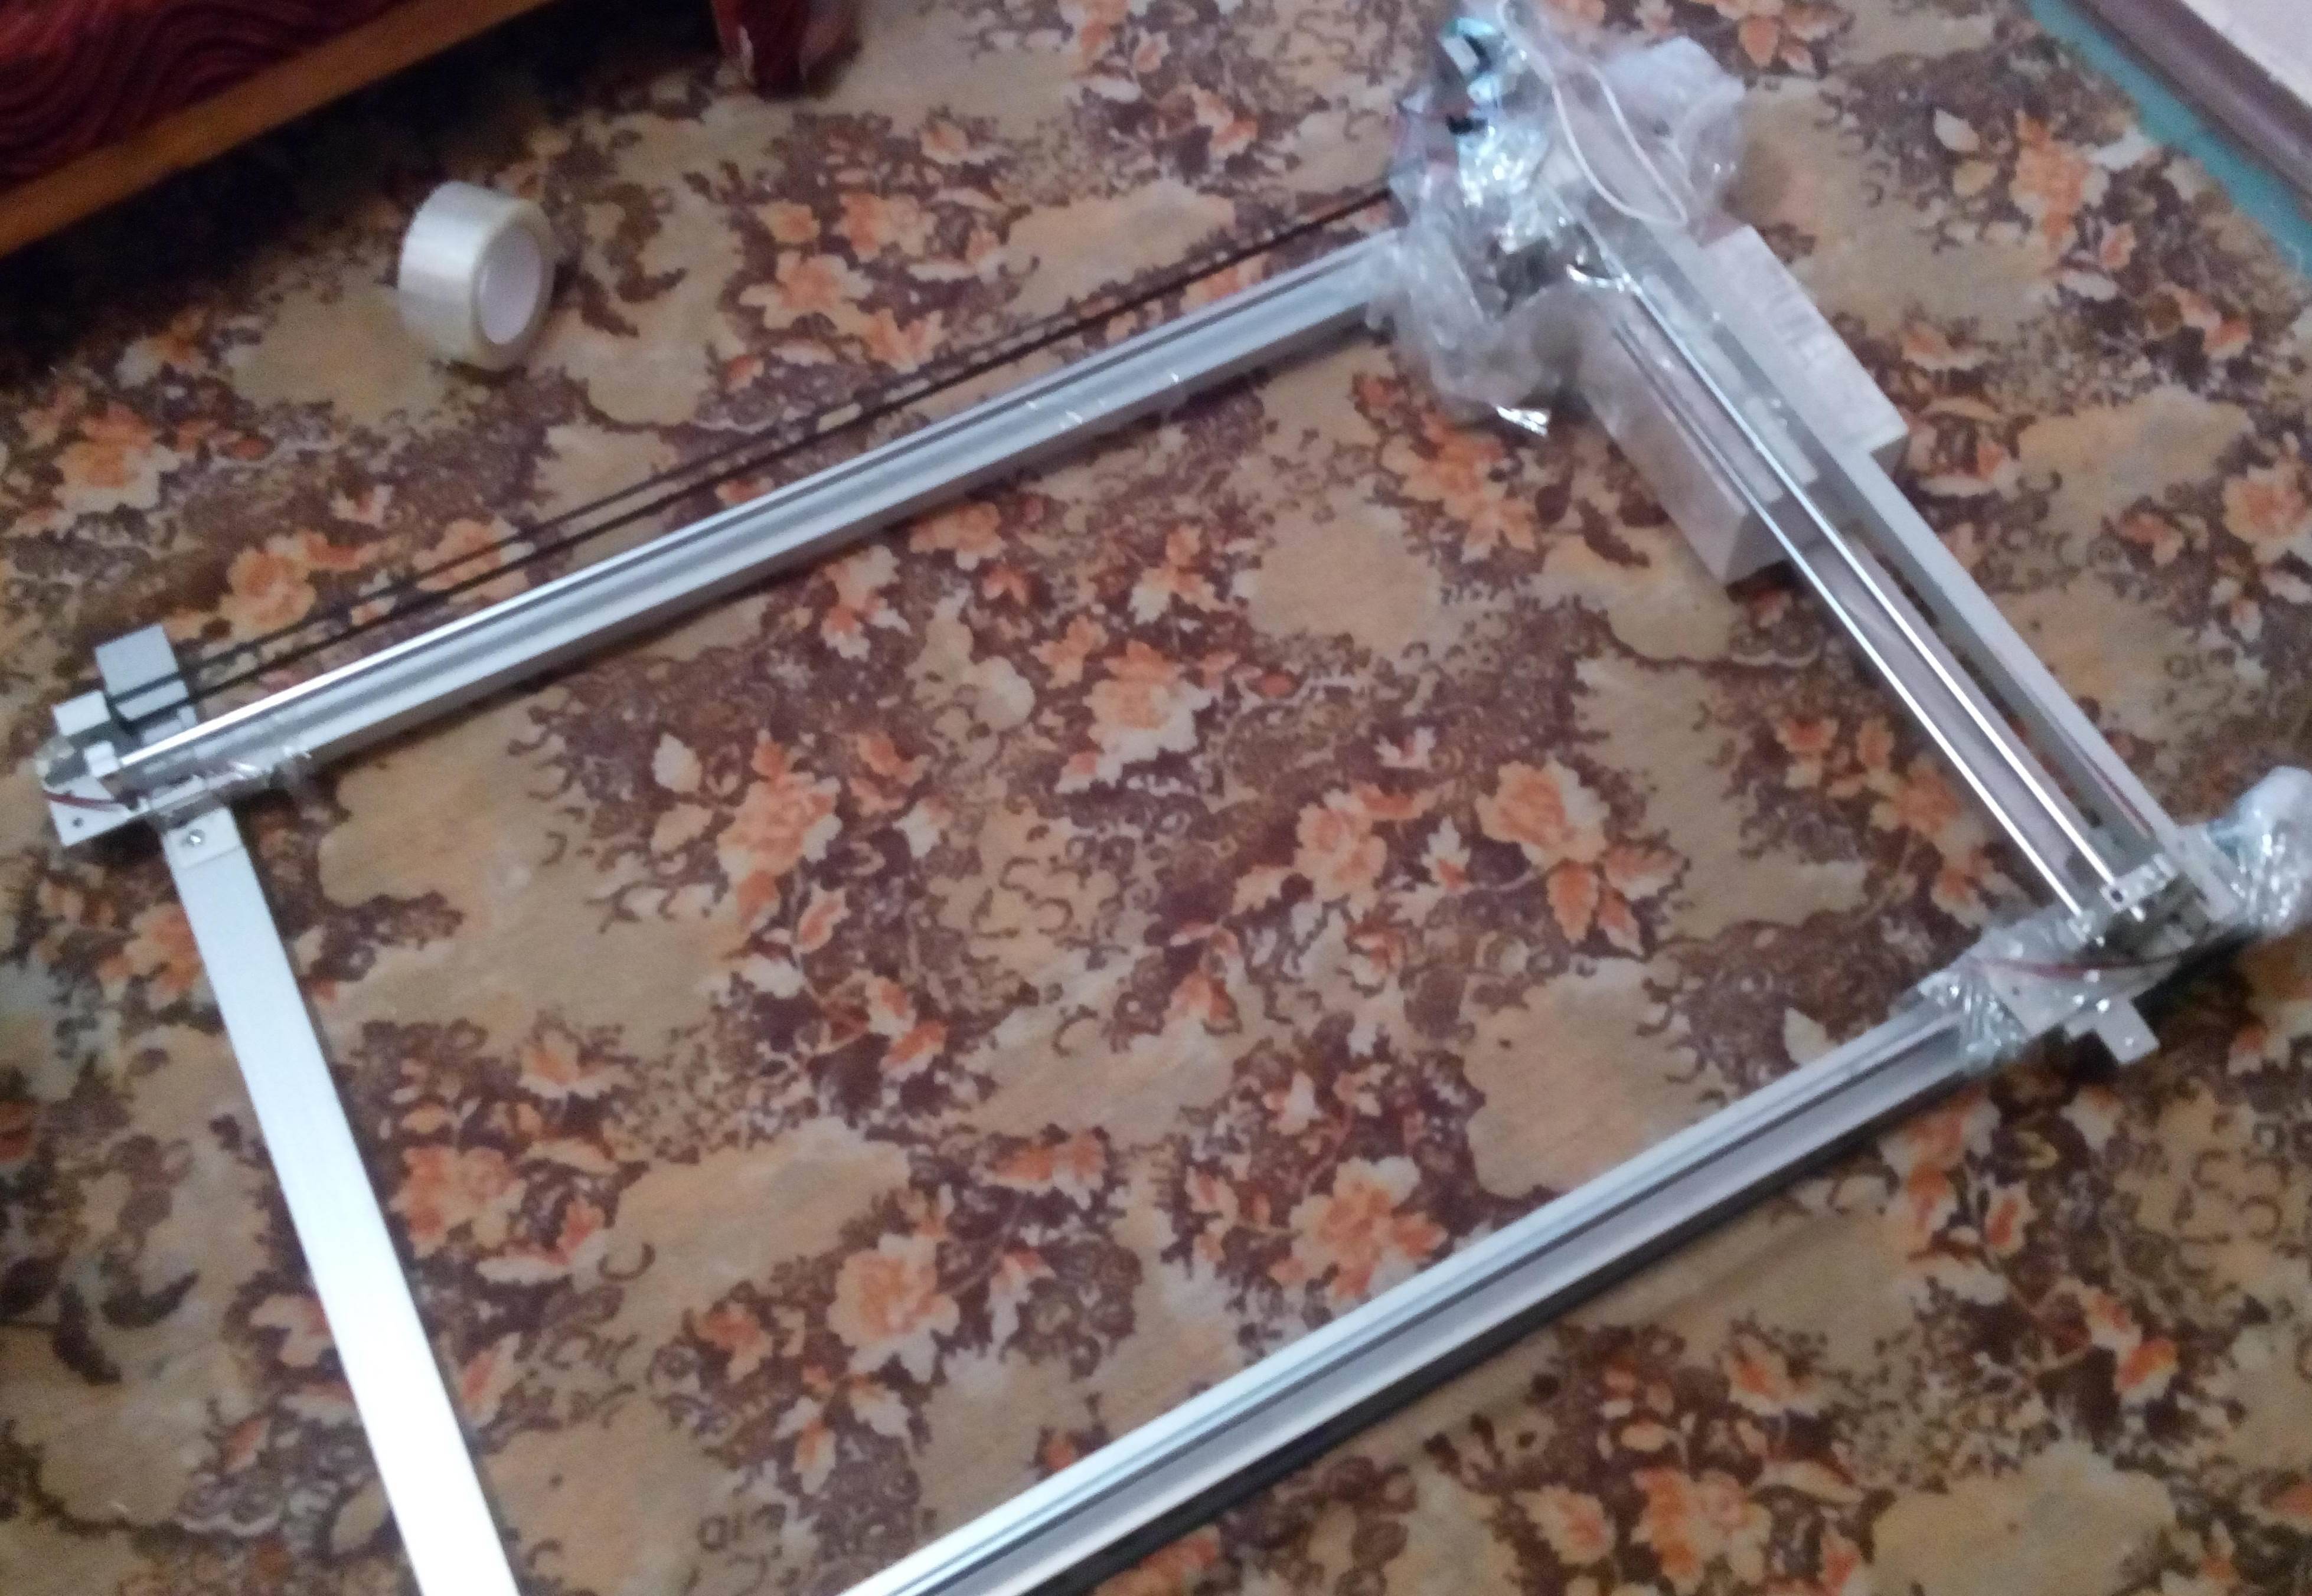
Main hardware for engraver, firmware for the controller and the desktop print management program Moving the carriage along the X and Y axes using stepper motors. Adjustment of the impact force using the voltage on the solenoid and solenoid impulse parameters
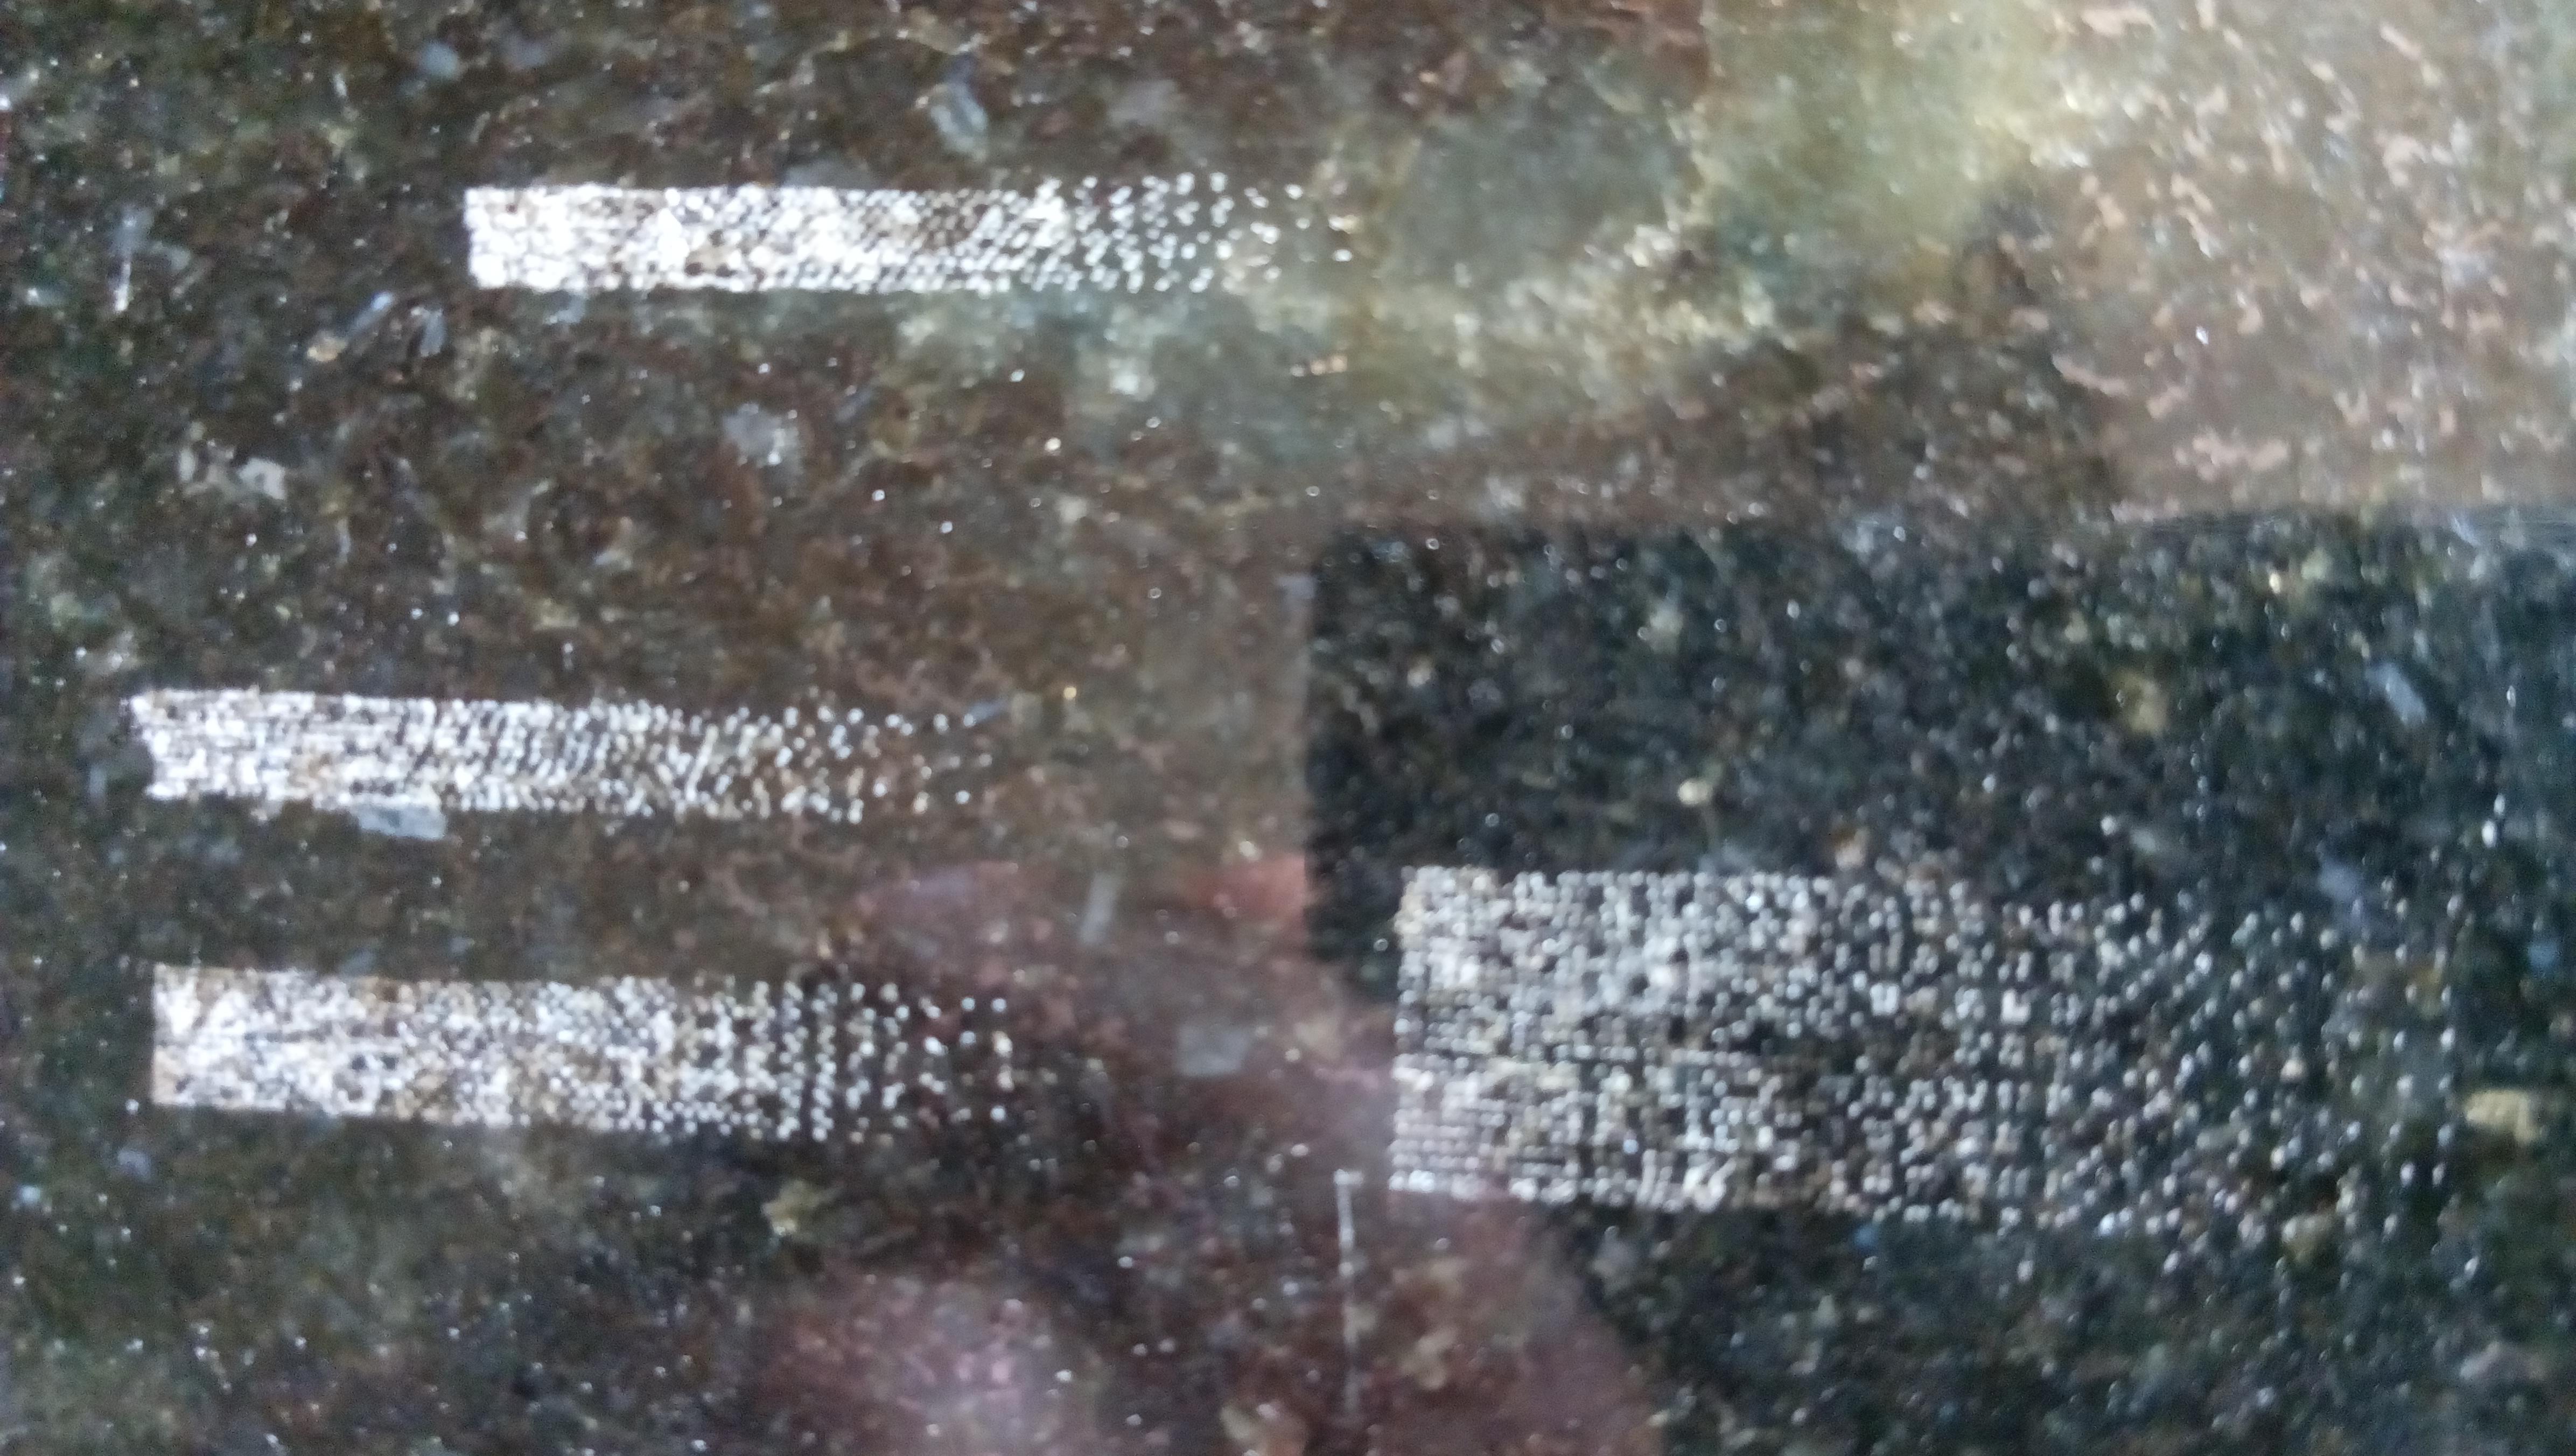
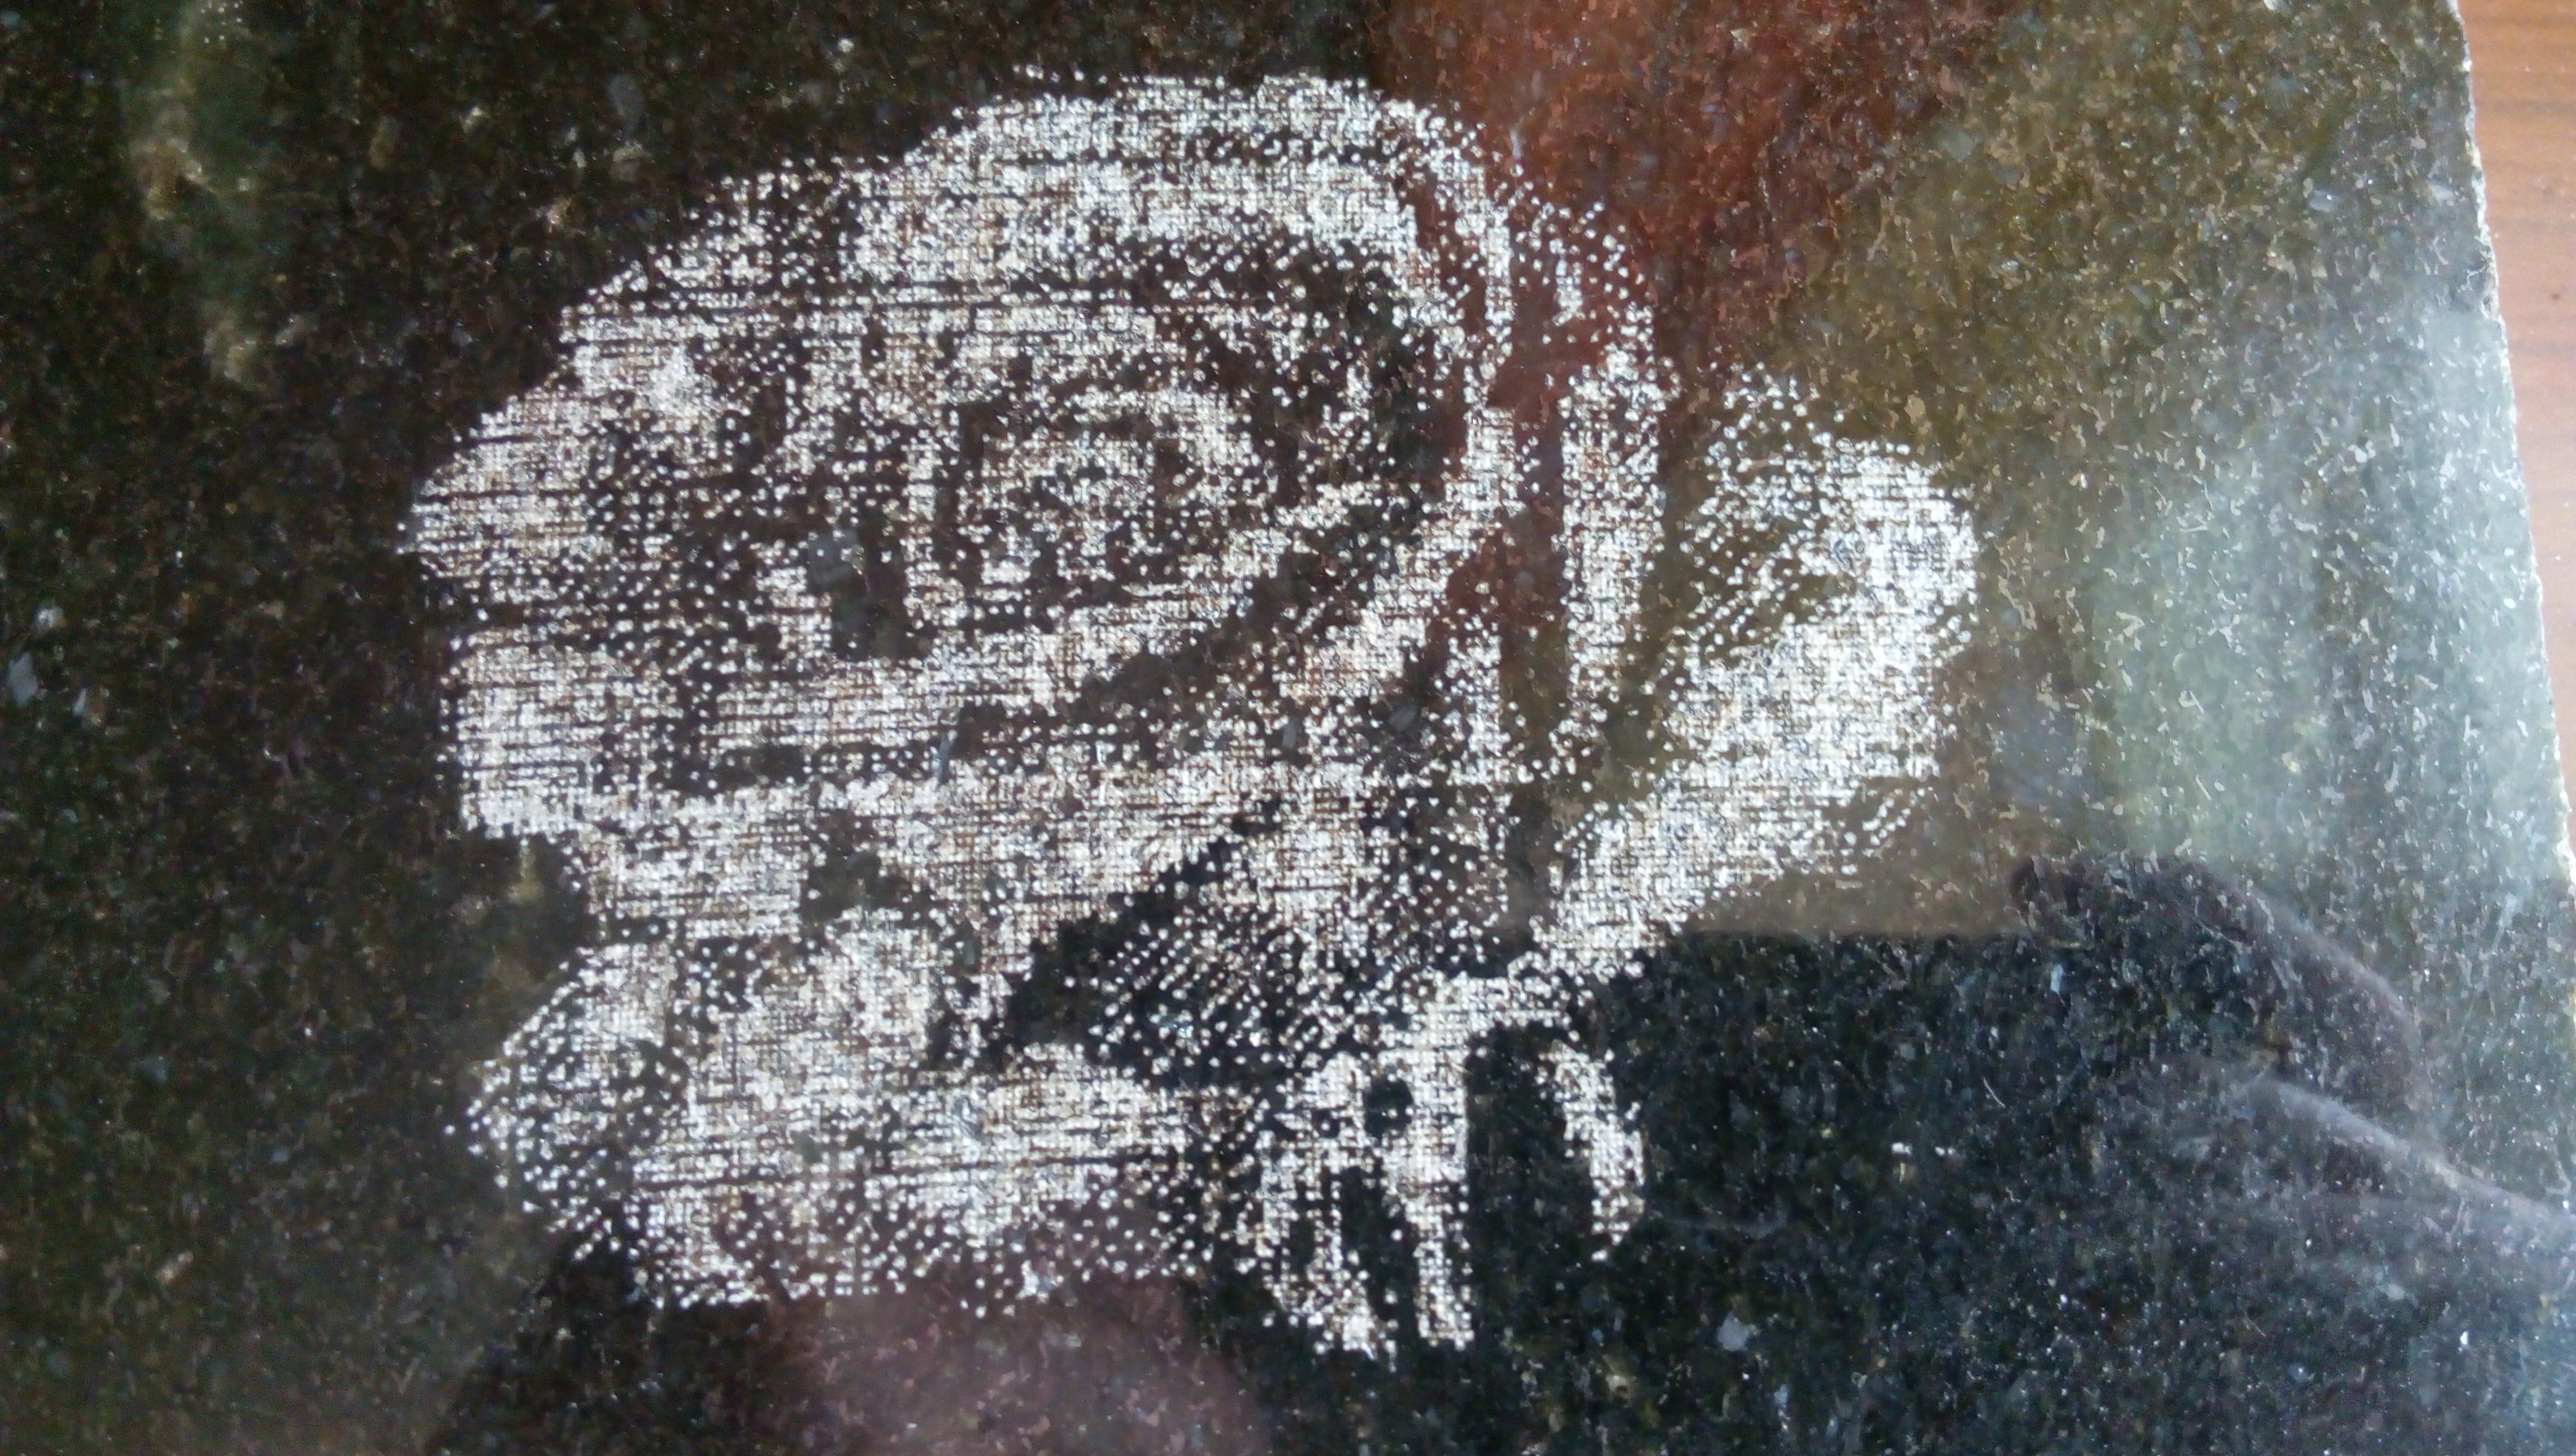
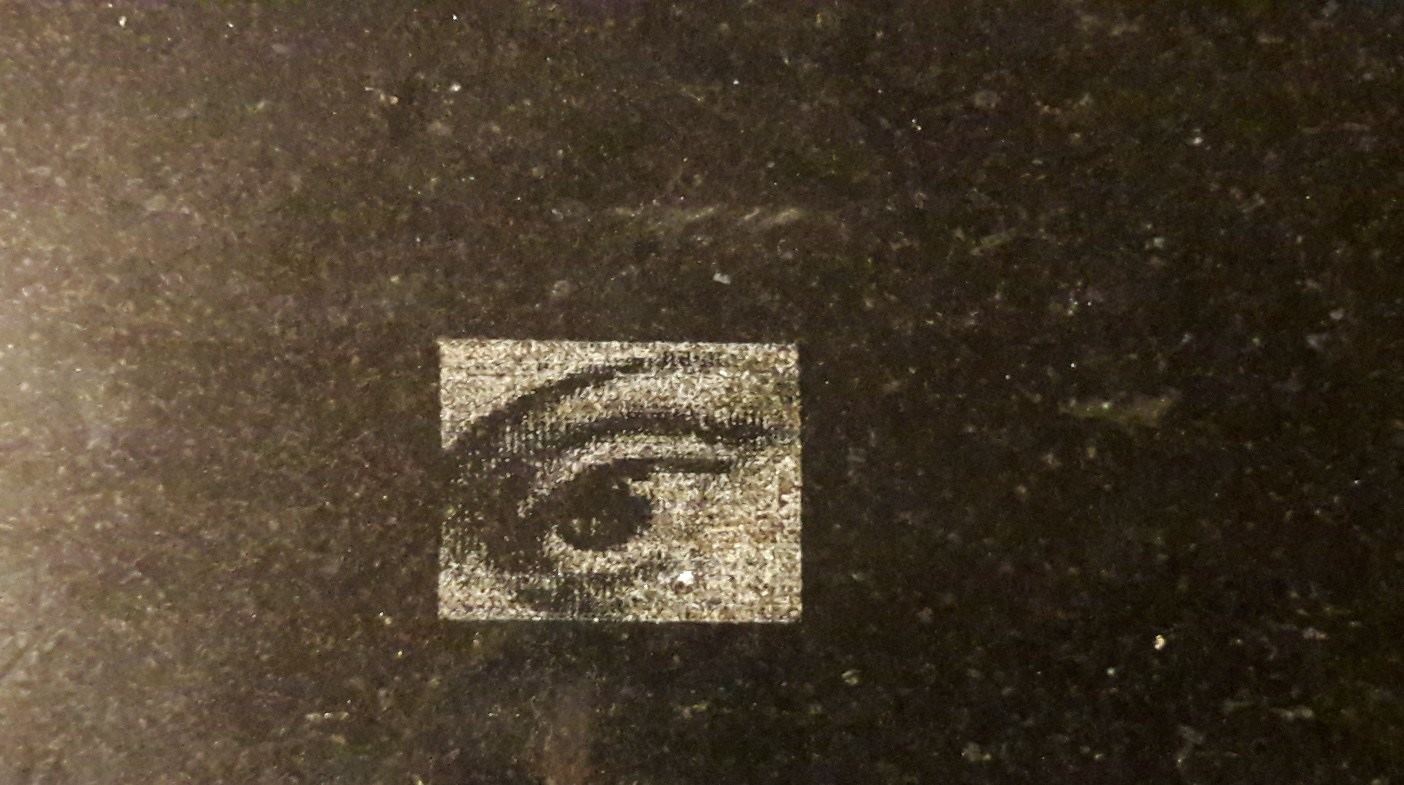
The original image is converted to grayscale, after which each pixel is engraved on the stone with cutter strokes. The cutter leaves a light trace on the initially dark surface of the stone. The more blows are made to one point, the lighter the trace left.
The carriage moves along the surface of the stone with the help of stepper motors and screw guides
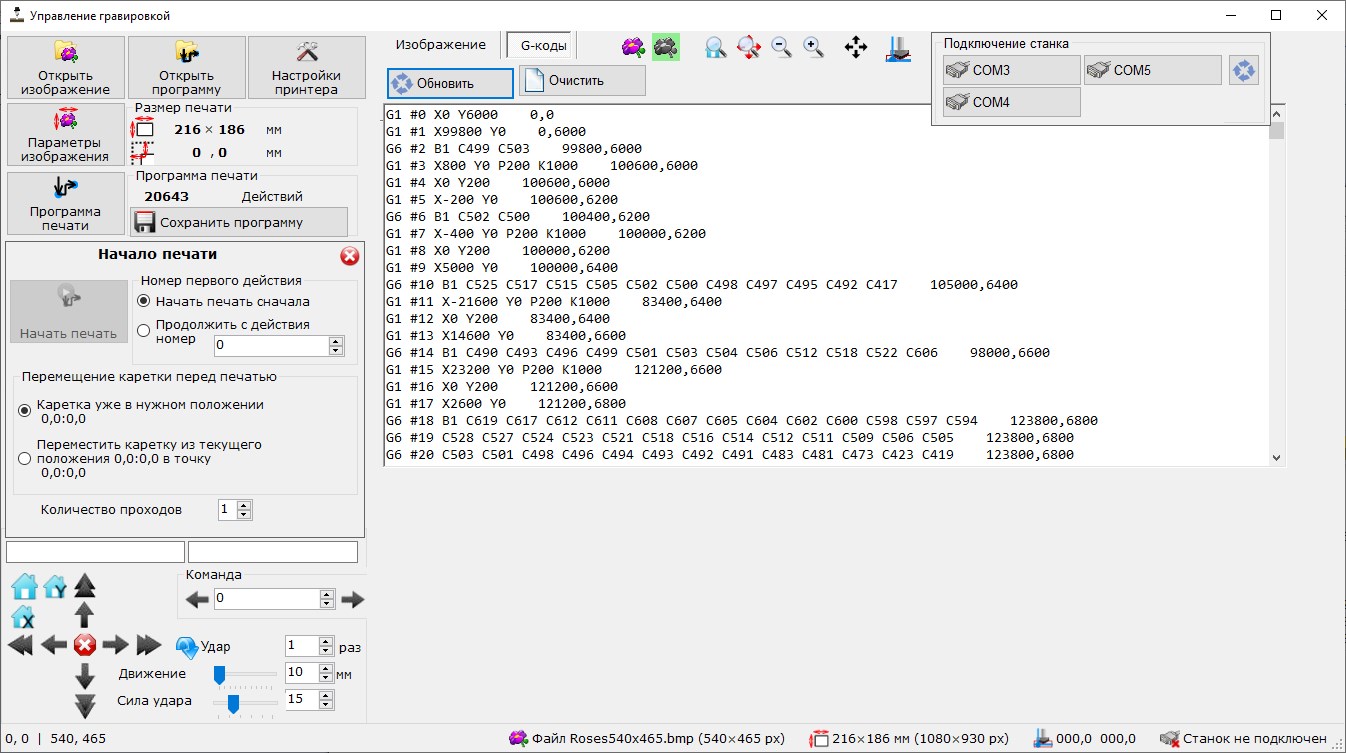
The transmission of commands to the controller is carried out from the PC via a cable. For this, an Engraver.Control application is used. Software allows you to create a print program, send it to the controller and manage the printer (both in manual mode and automatic printing)
Main system parameters:
- Engraving area size – 1000x600mm
- Сarriage movement speed – 10..15mm/sec (fast travel modemode) 5..10 mm/sec (precise during printing)
- Print speed – 20..22 operations per second (geometrical speed depends on brightness of print image white colors – slower, black colors – faster)
- Stepper motor
- voltage – 24V
- current – 1.6A
- Engraving solenoid
- voltage – 24V
- move distance – 3mm
- Material for engraving – any type of stone, glass, polished metal
Engraver Control application
Desktop application for work of engraving machine. Developed on C++ using .Net framework. Can work on any PC with operating system supporting .NET framework (windows 7,10,11) 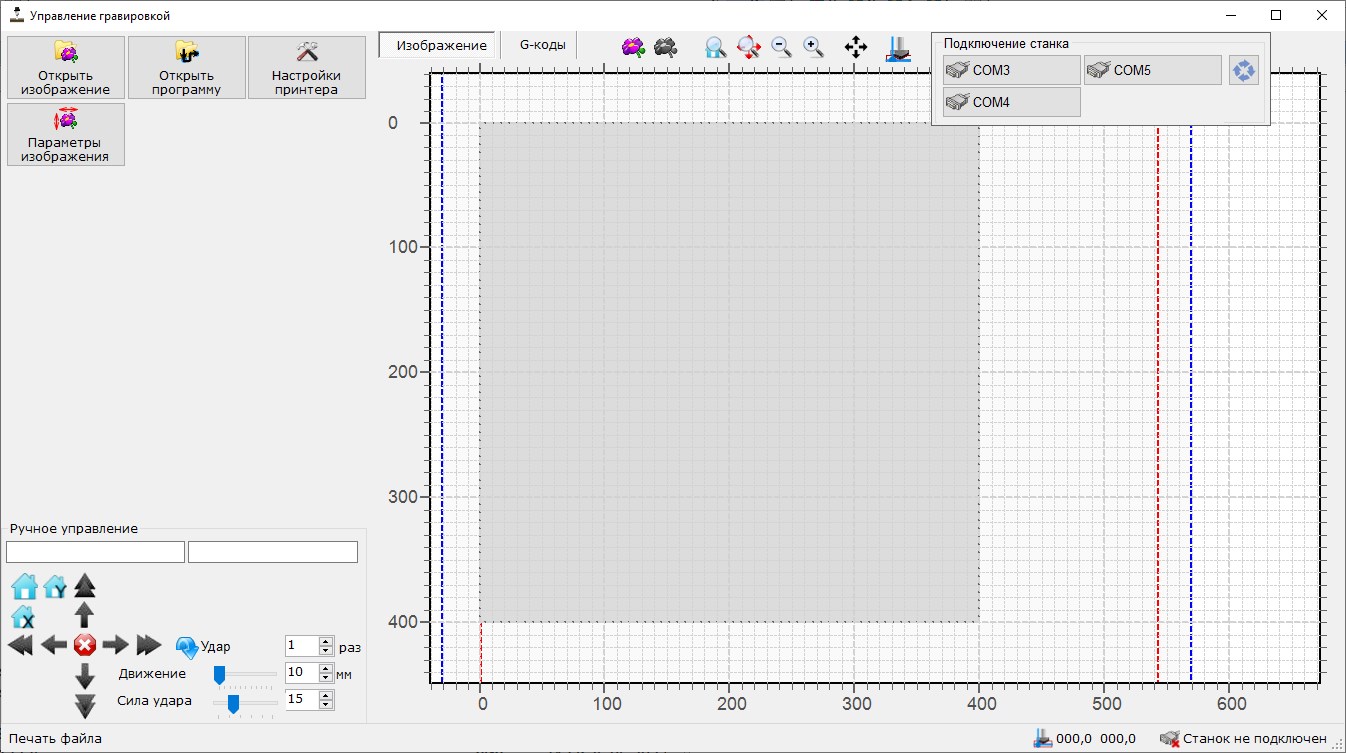
Main window include:
- Panel for manual control of engraver
- Status of connection with printer
- Buttons for main functions – load image, load previously saved program, printer settings, image parameters (unlock process of image preparation and program generation) printing start (available after program generation of when previously saved program loaded
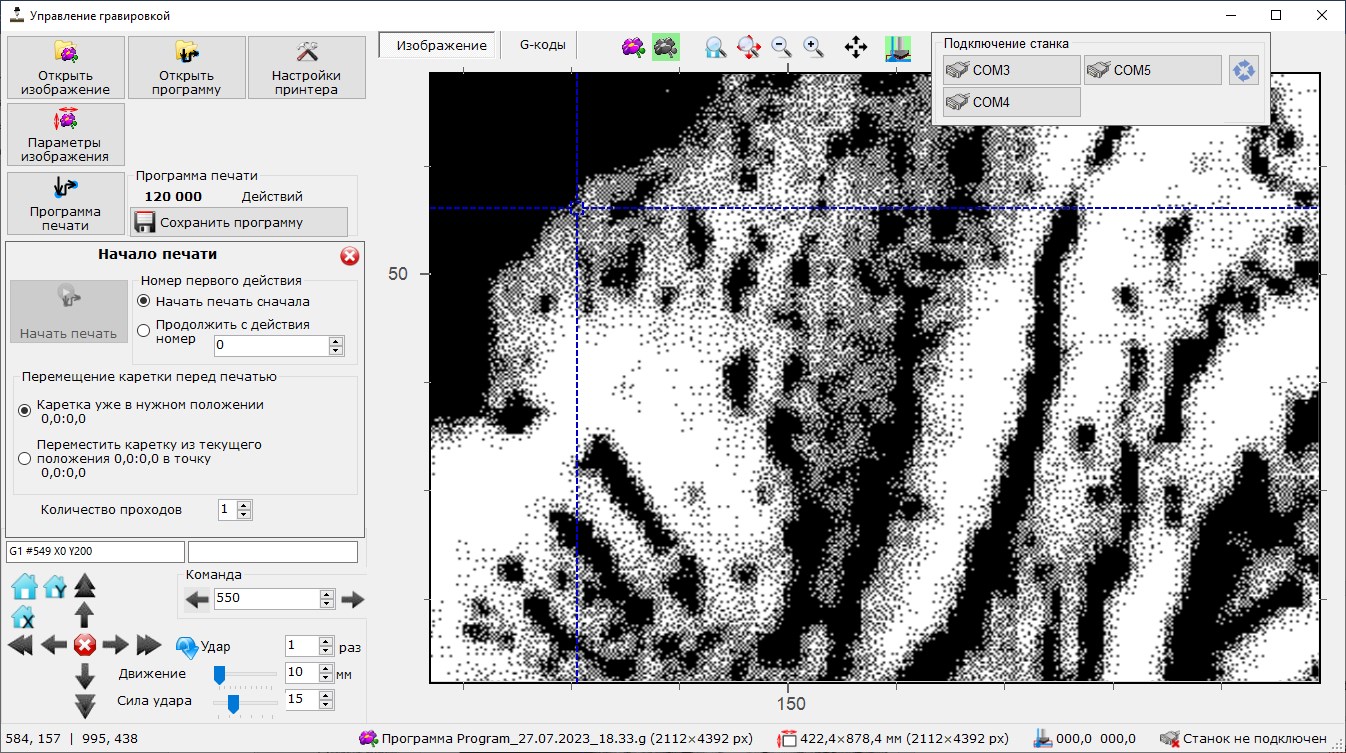
- Working area for scalable printing preview which include
- Rulers with real size scale
- Boundary of working area(size is set before printing)
- Boundary of stone for engraving (size is set before printing)
- Initial image overlaid on the print area
- Converted image with shows the position of all pixels to be engraved (overlaid on the print area)
- Position of carriage
- Next position of carriage according to current command number (during printing or printing preview)
- Printing control - current command number, commands remaining and elapsed time and buttons to pause and continue printing (available during the printing)
Main functions of Engraver control application:
Establishing a connection with the printer through any of the available serial ports
Manual control of engraver

- Stop current movement
- Move by fixed distance in any direction (customizable)
- Start movement in any direction
- Make cutter strike several times (customizable)
- Change cutter strike power
- Move to initial position (X, Y or both)
- Send manual command to controller and receive answer
Change parameters of engraver
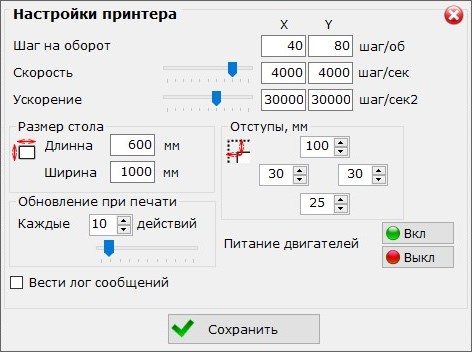
- Size of printing area
- Steps per rotation value (independently for each axis)
- Default boudaries of enfraving area
- Refresh rate for sending feedback to the control application
- Manual power off on the motor windings (for manual movement of the carriage)
Load image for printing
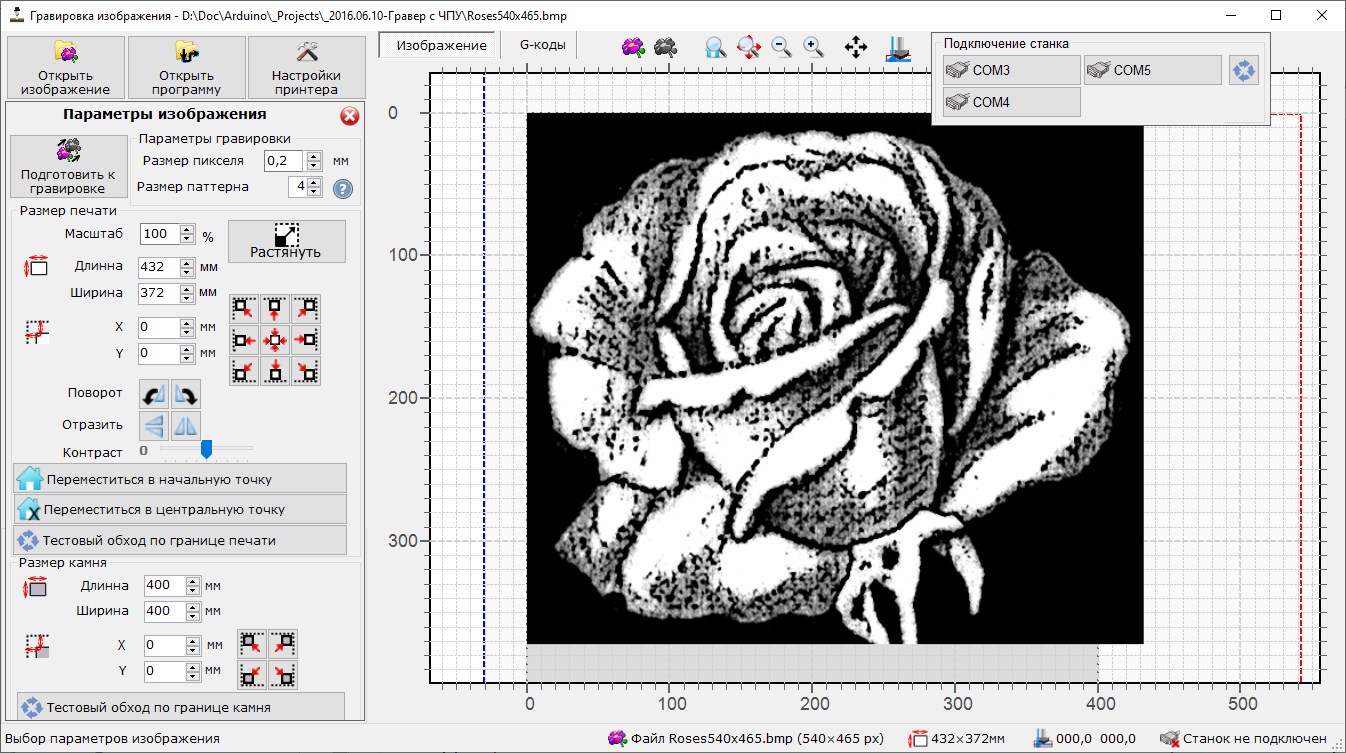 Grayscale images in BMP format is preferable to use. Color image can be converted into grayscale format during printing preparation, but best result will be for initially prepared images
Prepare image for printing – convert original into black-white pixel set
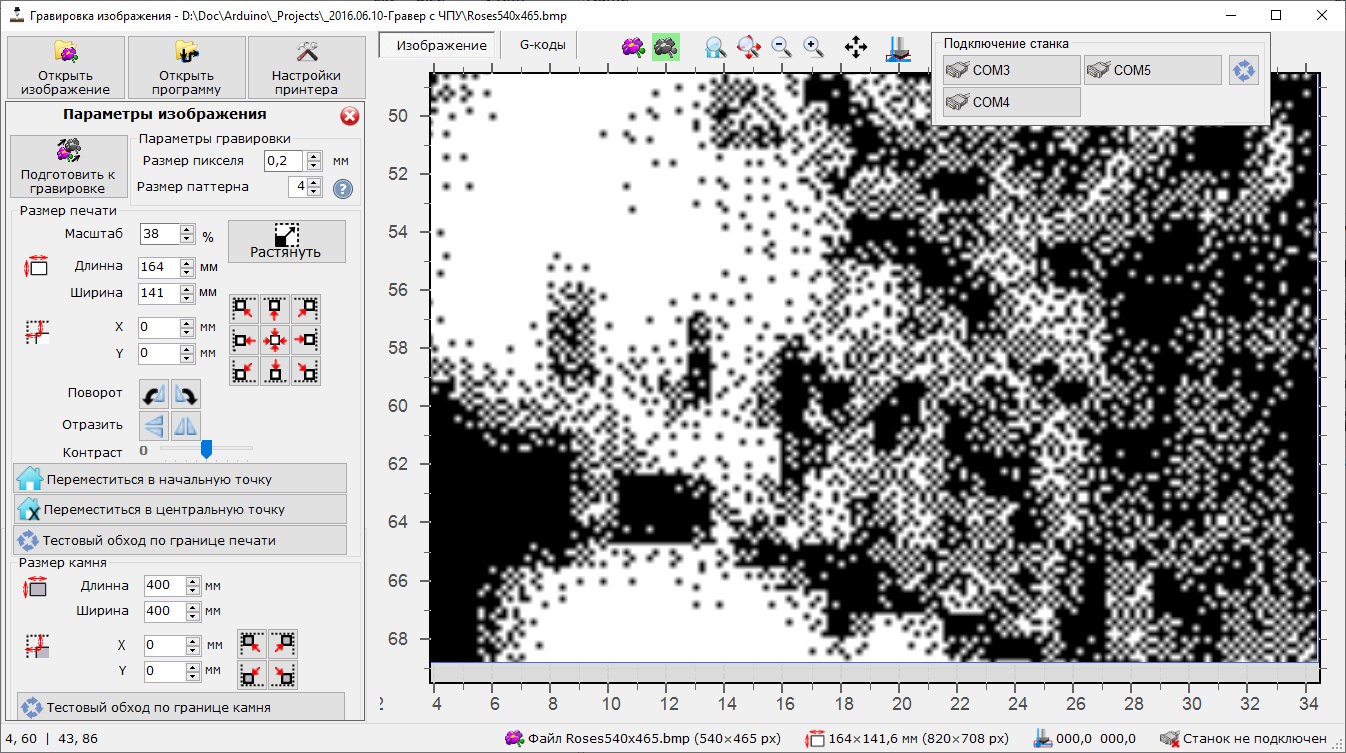
- Set physical pixel size
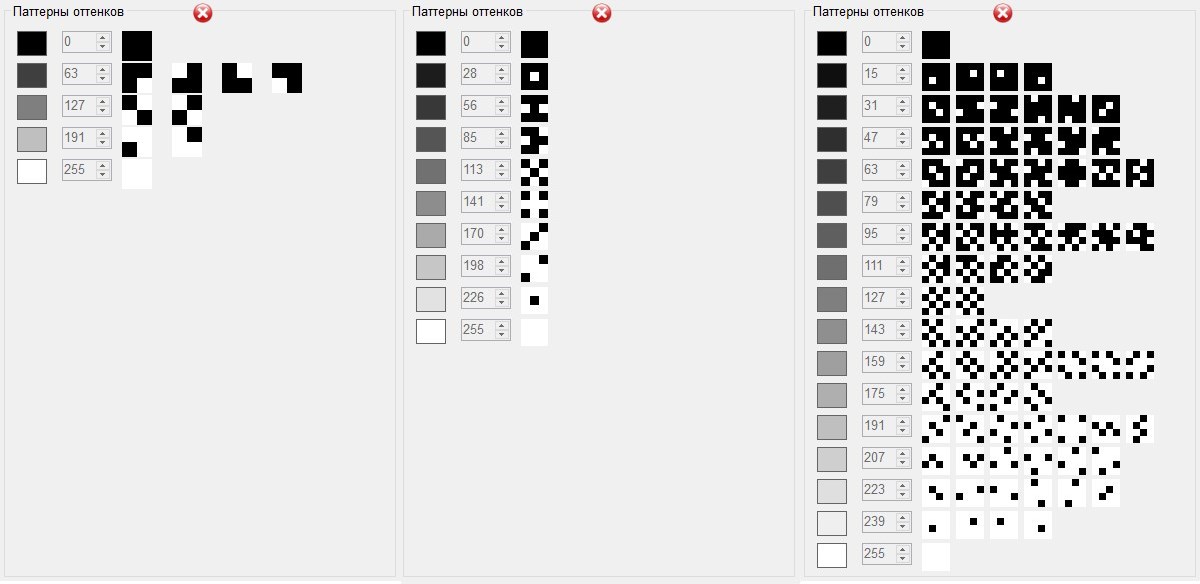
- Set pattern size for each pixel. Each pixel of original image converting into pattern of black and white pixels. Depends on pattern size a different number of shades of gray can be printed (4 shades for a 2x2 pattern, 9 shades for a 3x3 pattern, 16 shades for a 4x4 pattern)
- Different number of shades of gray can be printed (4 shades for a 2x2 pattern, 9 shades for a 3x3 pattern, 16 shades for a 4x4 pattern) To avoid clearly visible repeating patterns for each hue, several options are used, selected at random during the preparation.
- Resize image to fit with required print area according to pixel size and target physical size
- Create margins and set the starting point of the image (to prevent overprinting)
- Rotate or mirror image (if required)
- Change brightness of image (make it brighter or darker with corresponding changing of engraving actions.)
- After finalization of all parameters test movement of carriage can be activated. In this mode carriage is moving along the outer border of the printing image but engraving cuter not toch stone surface. This allows to check that all settings for the image size and margins are correct and during real printing the carriage will not go beyond the boundaries of the stone on which the engraving is performed. Very important for printing on stones of complex (not rectangular) shape
Generate printing program.

- Based on black-and-white image (after converting) generating set of G-codes of carriage movement and cutter strikes
- Carriage movement optimized to avoid wasting time moving over dark areas where no hit is needed
- Generation time depends on image size and pattern settings. For real images сcomparable to the area of printing (600x1000mm) and good quality of printing (pattern size 4x4, 0.2mm pixel size) around 100 000-200 000 actions generated (depends on on the number of light tones of image), which corresponds to 50-100 kPx of printing (each pixel coded by two actions – movement int position + cutter hit with different power) ~500-1000 actions per second generating on typical PC, corresponds to 3-4minutes of generation Result program with .g extension and size 15-25 Mb (depending on the number of light tones in the image and, accordingly, the number of actions)
- After program generating it can be saved in text format (for future use)
Printing preview and process
- This mode activating after generation of program or opening previously saved program
- Any action can be manually activated. In this mode previous and next position of carriage can be shown on preview of printing to understood trajectory of carriage. Checking doesn’t required connection to printer
- Normally printing start from first command of printing command with carriage in “home” position
- If required, printing can be start from any command number (if printing continuing after pause)/ In this case you can choose:
current position of carriage corresponds to coordinate in program
carriage in “home” position and must be moved in target position before continuing.
- Printing control panel
- Buttons for pause and continue current printing.
- Selection of action number (for manual start from any position of program)
- Current command number, quantity of programs loaded in printer controller and queue size
Engraver firmware
Based on modified Marvin firmware for 3D printers. Uses a modified set of G-codes:
G0 X1 Y-1- Start moving the carriage in the specified direction until a stop command (M0) is received or the limit switch is triggeredG1 #0000 X000.0 Y000.0- Move the carriage along the X and Y coordinates at the specified distance, mmG5 #0000 P000 C000- Make cutter C strikes duration P msG26 X0000 Y0000- Set the specified coordinates for the current position (without moving)G27 X Y- Set current position as start for each coordinateG28 X Y- Start moving to the starting position for each coordinate (before the limit switch is triggered)G92 #0000 X000.0 Y000.0- Move the carriage to the specified position (taking into account the current position), mmM0- StopM1- Stop processing to get the next sequence of commandsM2- Start printing commands from the queueM3- Display the list of commands in the queueM17- Power on steppersM18- Power off steppersM92 X000 Y000- Set the number of steps per rotationM114- Display the current position of the carriage and limit switchesM201 X000 Y000- Set the acceleration of steppers for each coordinate, step/sec2M203 X000 Y000- Set the speed of steppers for each coordinate, step / secM500- Saving the current position and settings in the ROM (EEPROM) of the controllerM501- Loading the current position and settings from the ROM (EEPROM) of the controllerM502- Reset parameters to standard (factory)M503- Output current parameters of engraverM666 #00000- Unlocking system operation using a unique ID from the control programM667- Blocking the system Receive commands via the serial port from the control program manually (in maintenance mode). It is possible to provide work with a specific instance of the control program to prevent unlicensed use
Components
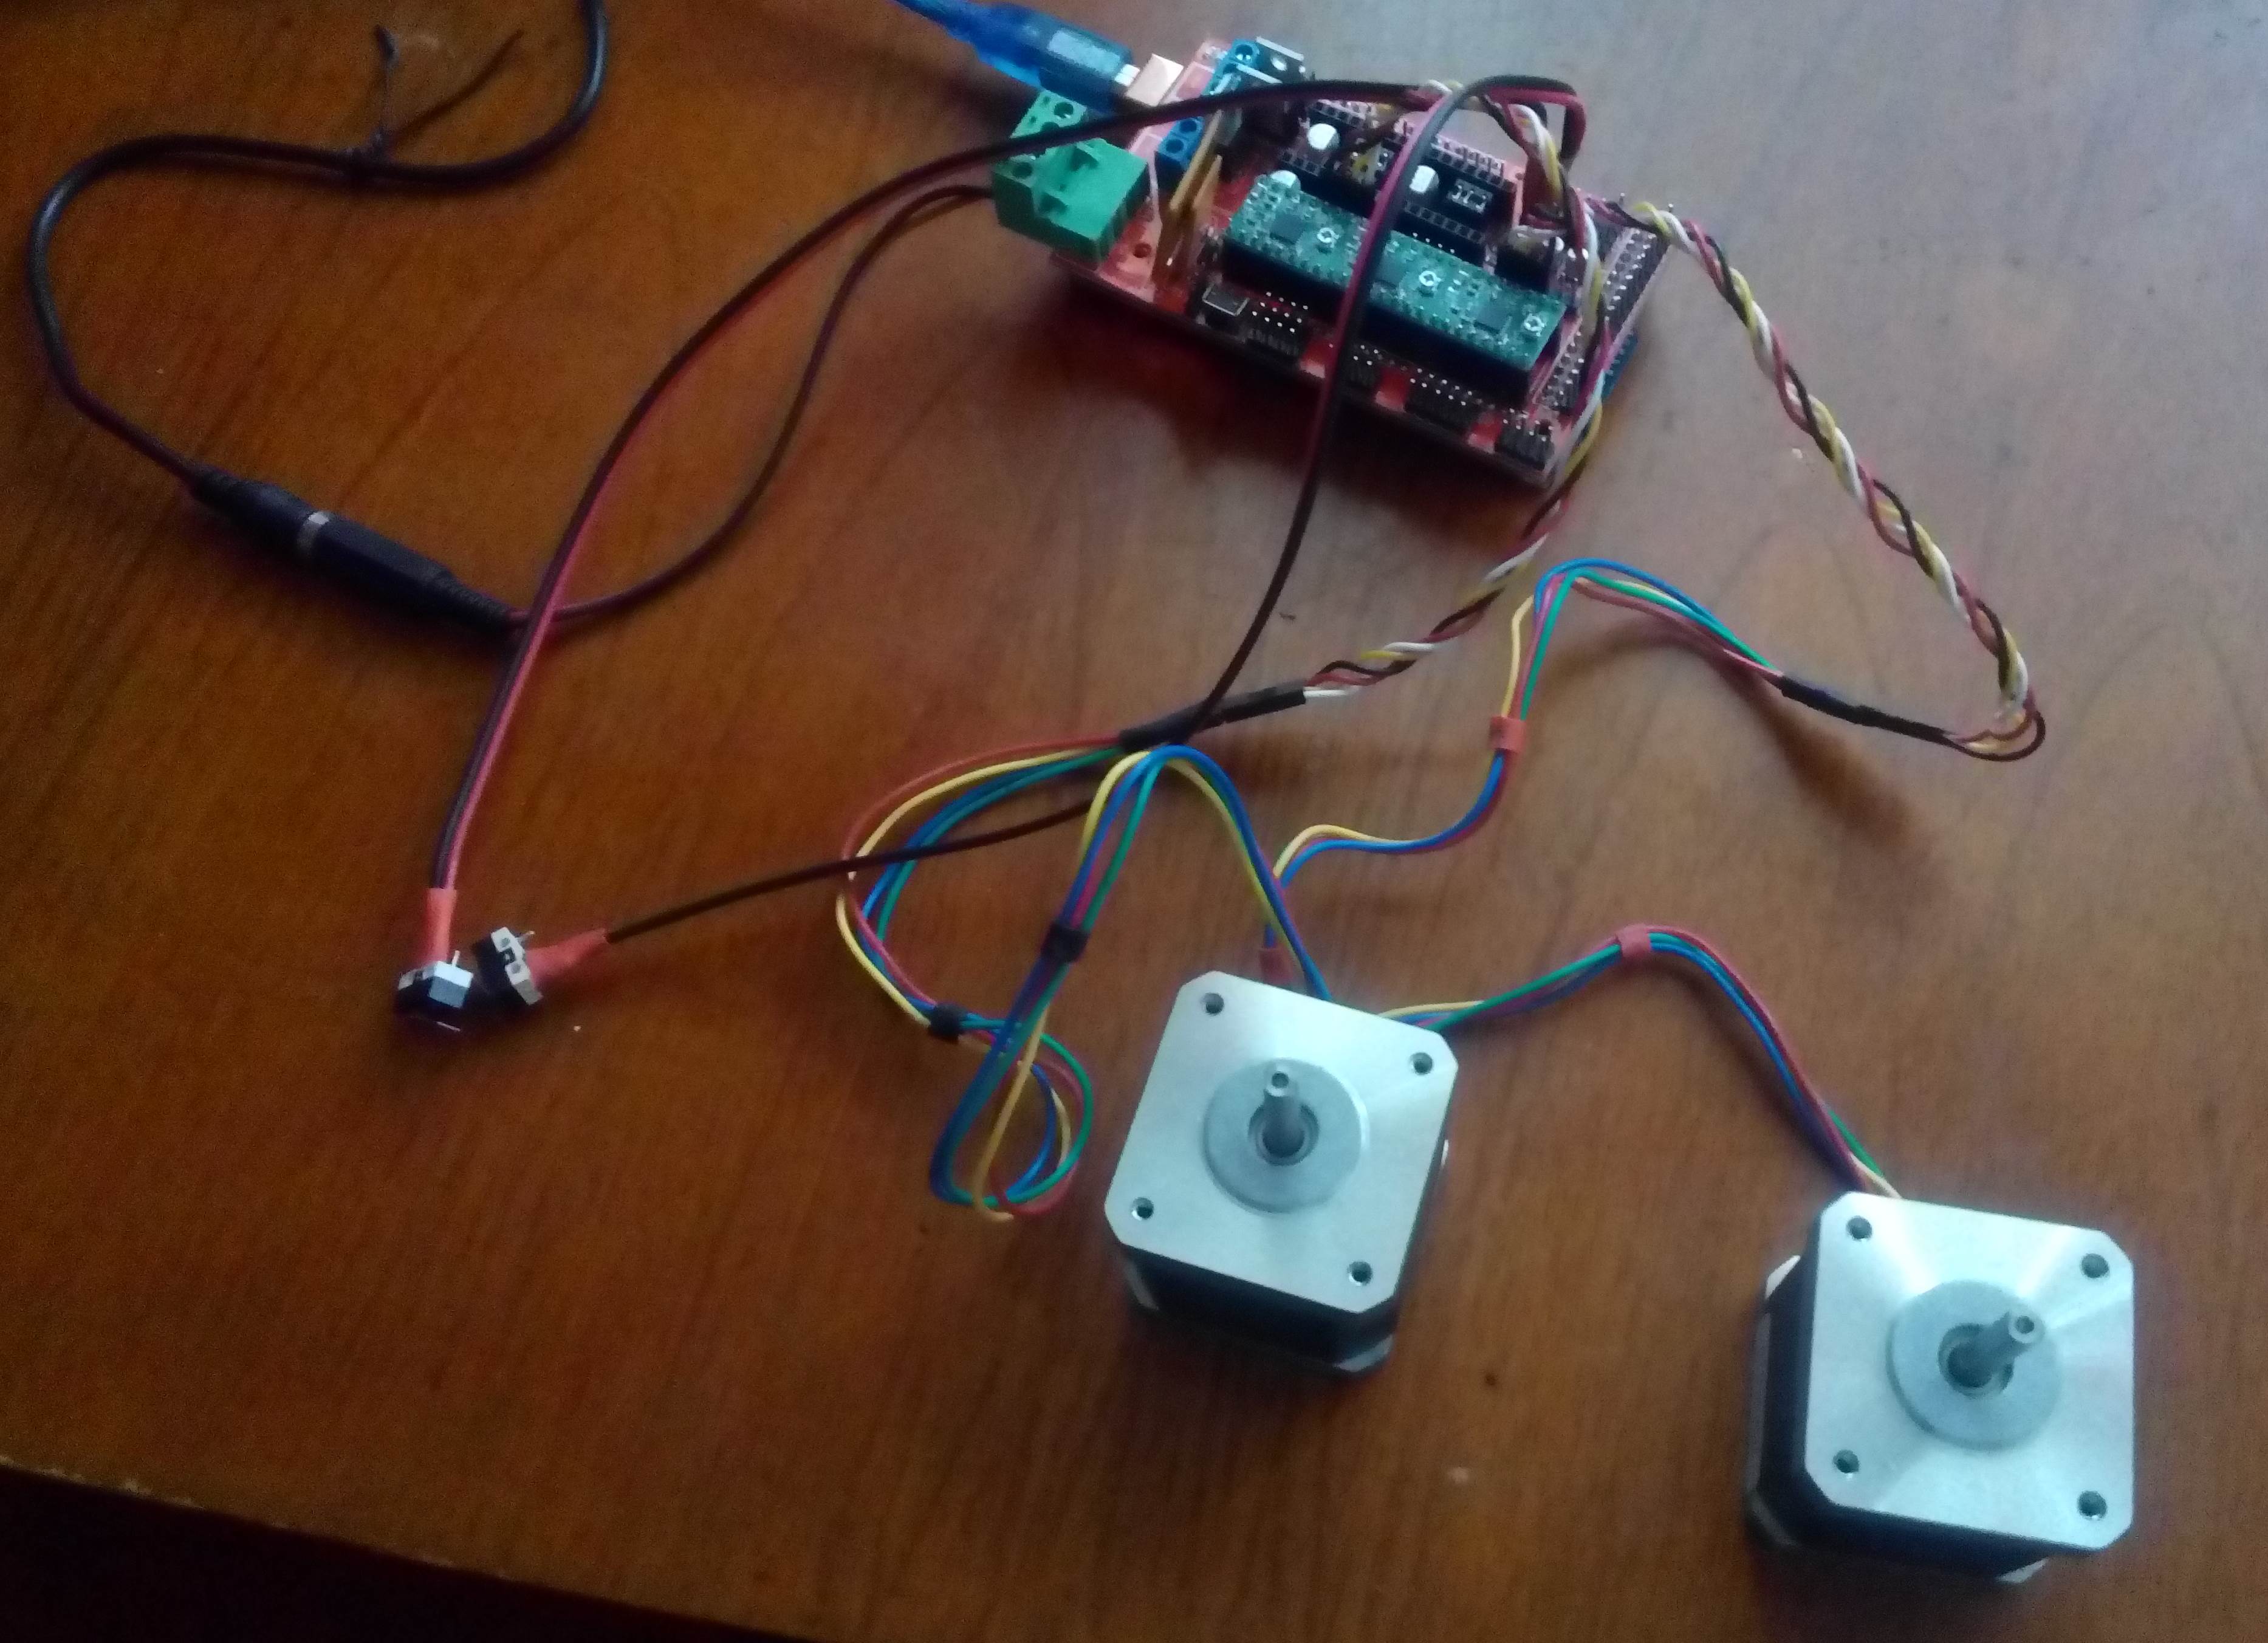
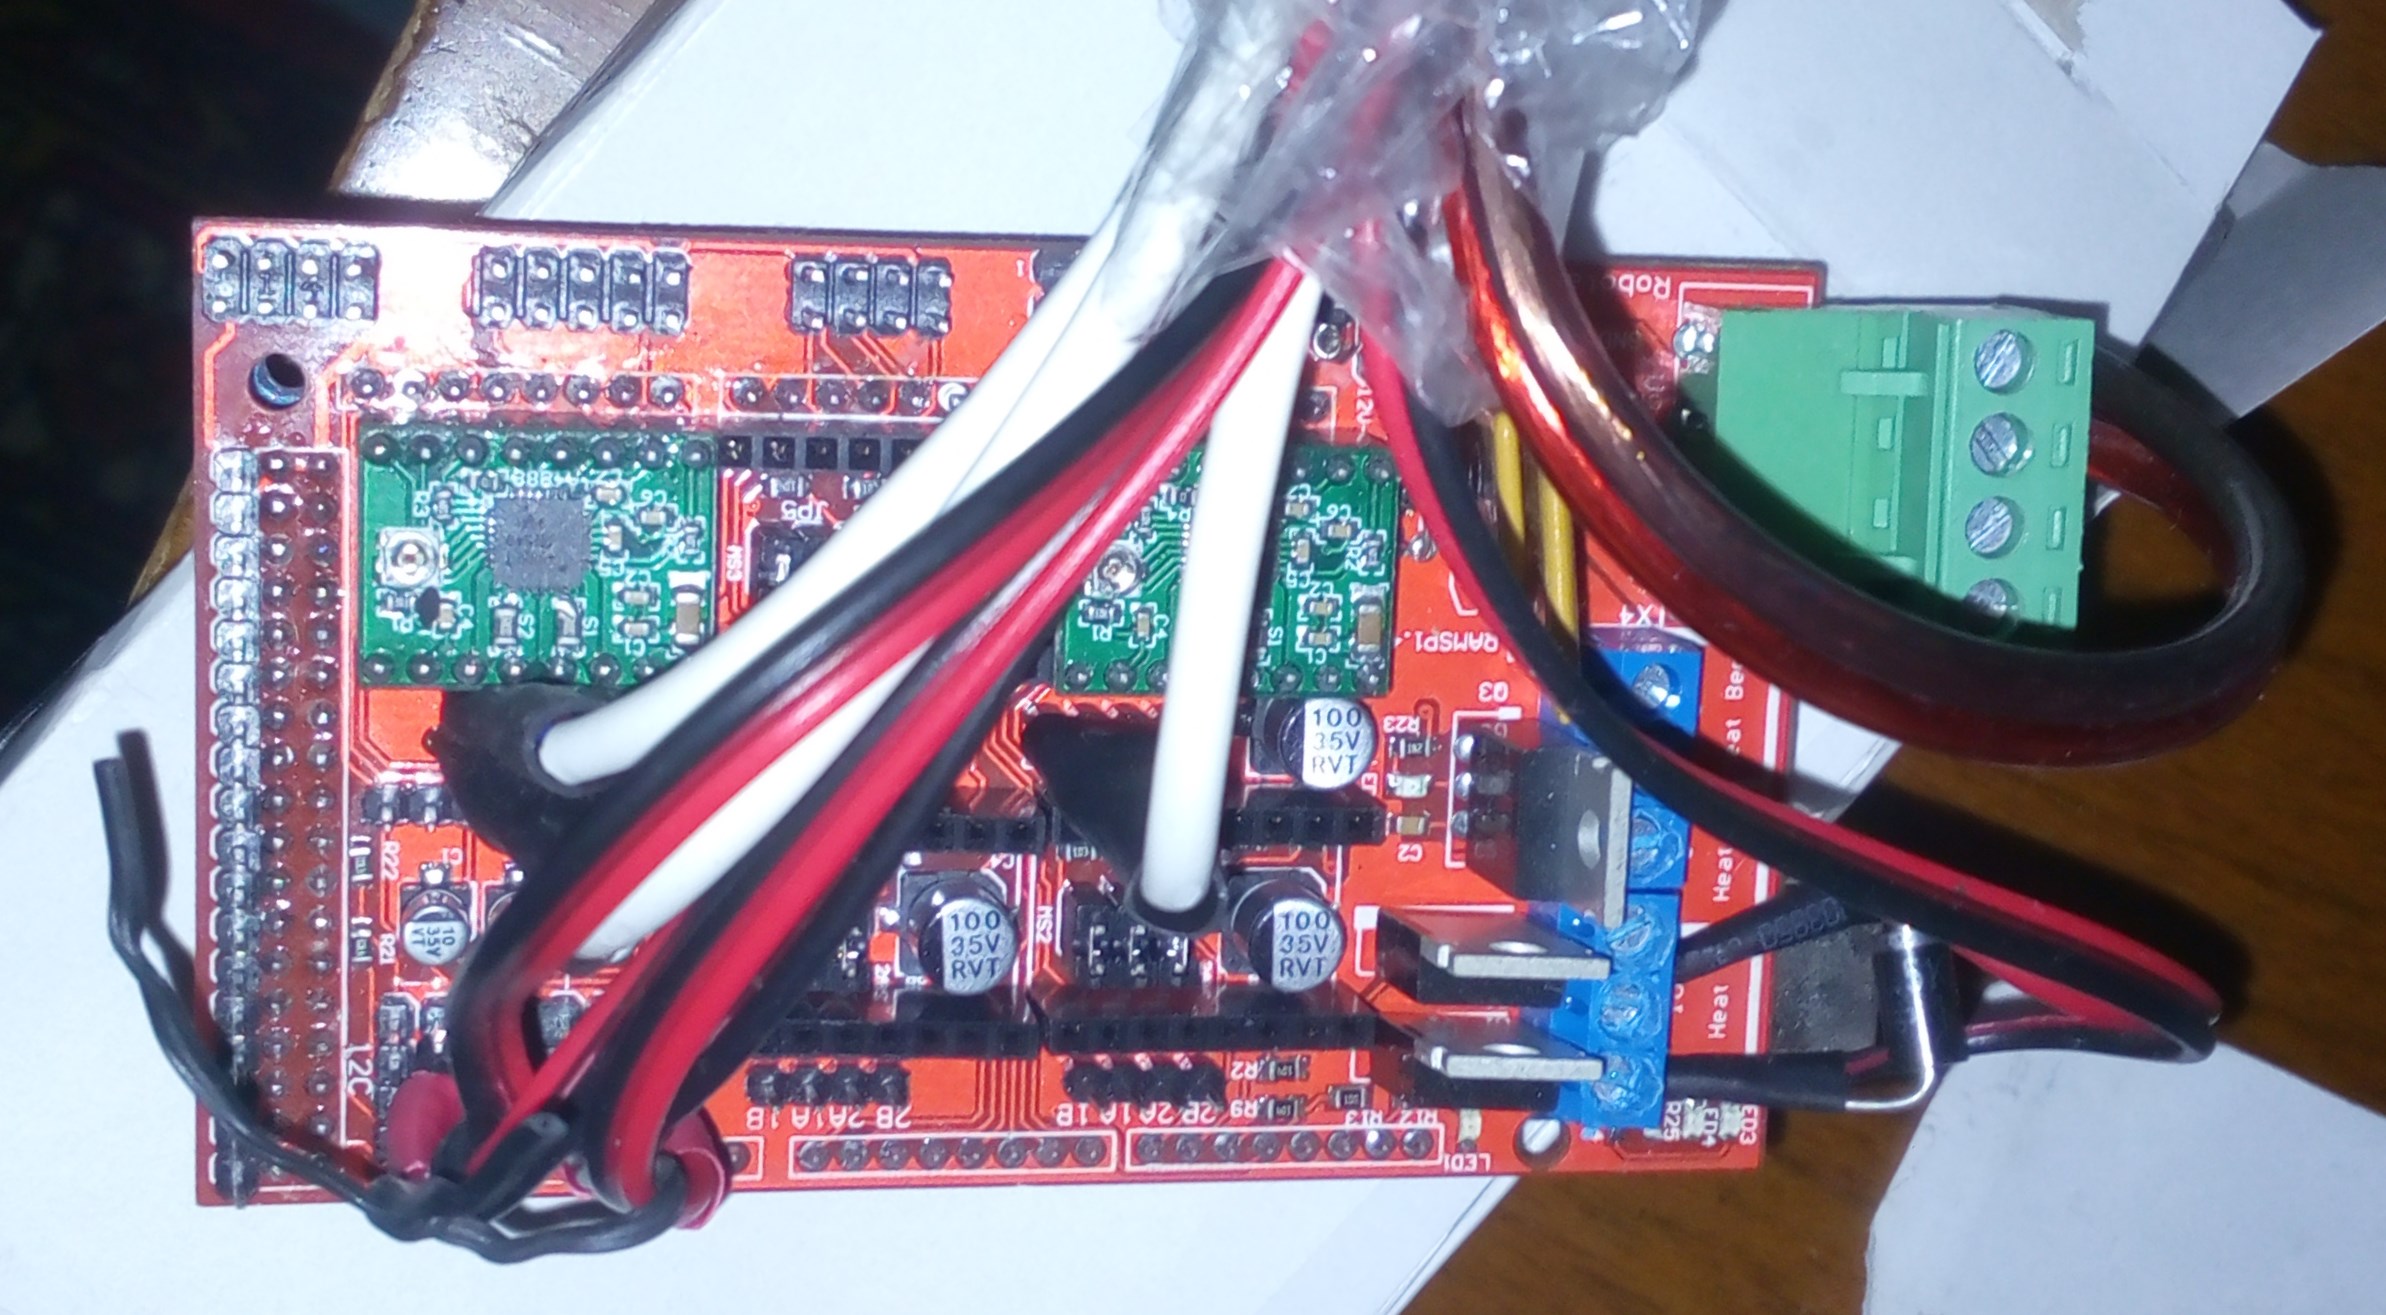
- Ramps 1.4 board
- Arduino MEGA controller
- Stepper motor driver A4988
- Stepper motors of size NEMA 17 1.6A or similar
- 24V solenoid
- Power supply, pulse, 220V->24V for 5-6.5A
- Limit switches (mechanical or optical)
Wiring diagram

Possible further improvements
- Adding independent control elements to the printer which allows printing without connection to PC
- Adding display to printer to indicate current printing status, printing previre and other elements of interface
- Further improvement of stability, speed of the interface of the control application that processes images and generates engraving programs
- Redesign for laser engraving
Photos